entree

Creamy chicken curry with pilau rice

April 30, 2012

Rich with toasted spices and thick with cream and
almonds this curry goes beautifully with the butter
yellow pilau rice.
Curry is one of my absolutely favourite foods, I cannot get enough of the rich spices and creamy sauces and though not entirely authentic, this is my recipe for an very delicious chicken curry.
I like to serve it up with buttery pilau rice and a hot baked naan, I didn't make my own naan this time due to a store cupboard failure! But I'll be popping up the recipe later in the week if you fancy doing the whole hog from scratch.

Recipe:

Serves 2

The curry:

2 chicken breasts
1/2 lemon
150g natural yoghurt
3 cloves
1 tsp chili oil
salt and pepper
1 tsp oregano
1 tsp finely chopped garlic
3 cardamom pods
1 tsp freshly grated ginger
1 tsp ground Cinnamon
1 tsp coriander seeds
1 tsp cumin seeds
1 tsp garam masala
1 tsp paprika
1 tsp turmeric
1 small pot of double cream
3 tbsp ground almonds
1 tbsp flaked almonds
1 onion

The rice:

80g basmati rice per person, if making rice for more than 4 people double the quantity of spices)
knob of butter
1 onion
1 tsp turmeric
1 star anise
3 cardamom pods
salt and pepper

You need to marinate your chicken ideally overnight but for at least 8 hours to give it a good rich flavour and for the yoghurt to tenderise the meat. So we start with our marinade!

In a dry frying pan, toast the following of your spices; the cloves, cardamom pods, cumin and coriander seeds. Jiggle the pan until the seeds begin to pop and you can smell the spices wafting from the pan, tip the roasted spices into a pestle and mortar and grind to a fine powder. In a bowl large enough to mix up the chicken and yoghurt marinade, dollop in the yoghurt and your powdered toasted spices, also add in the chili oil, a good pinch of salt and pepper, oregano, ginger, garlic, Cinnamon, garam masala, paprika and turmeric. Mix the spices into to the yoghurt until you have a smooth and evenly orange coloured paste.

Chop your chicken into bite sized pieces then fold into the yoghurt, make sure the chicken is well coated and, as much as you can, push the chicken under the yoghurt so it is tucked underneath the marinade as much as possible. Cover the bowl with clingfilm and leave in the fridge for at least 8 hours but ideally over night.

When you are ready to cook the curry after the chicken has marinated, finely slice your onions and begin to fry them in a little oil in a large high walled frying pan. Fry the onions until they are golden brown, now pick out the chicken from the marinade and add it to the pan, but do not throw away the remaining yoghurt. By picking out the chicken and shaking off the marinade it gives the chicken a chance to fry and colour rather than 'poach' on the sauce, it ultimately gives the curry another dimension in flavour.

When all the chicken is browned, pour in the rest of the marinate and allow to bubble and reduce to a very thick paste. Now pour in your cream and sprinkle over the ground almonds, reduce to a very low heat and leave to cook out into to a golden, creamy sauce. If you find your curry become too thick add a little water to loosen it, the curry will be cooked after about 20 mins, I cook my rice during this simmering time so it's all ready at the same time.

To make the rice, begin by chopping the onion into a very fine dice, fry this in a saucepan in the butter for a few minutes until it has softened a little. Now add in your cardamom pods, star anise and turmeric, the butter and onions should turn a bright sunshine yellow, coloured by the turmeric. Fry this together for another few minutes until you can smell the spices in the air. Pour in your rice turn it in the coloured butter and fry for a further 2 mins, now tip in freshly boiled water so that it covers the rice by about 2 cms.

Turn the heat down under the rice and leave to cook, you need to keep an eye on it as the water will cook down until the rice begins to fry, you want this to happen, When you can see that the water is starting to sink below the surface of the cooked rice check to make sure the rice is tender but with a little bite left in it, turn the heat up under the pan and fry the rest of the water away, keeping the rice moving so it doesn't stick to the pan and burn. When all the water has gone add a little more butter to the pan and give the rice a good, hot sizzle to finish it off.

Serve up the curry with a sprinkle of flaked almonds on tops for texture and a pile of glistening rice beside it, smother a naan with butter and grill for a few moments before tucking it in next to your indulgent curry!


recipes

Cheese souffle with sweet red onion chutney

April 29, 2012

A simple supper made a bit special by a sweet red
onion chutney hiding underneath the fluffy souffle
On a lazy Sunday, especially if I've made good use of my drink accompanying nibbles on a Saturday, I like to keep suppers simple. Supper to me is a light meal later in the evening than dinner, enough to fill you up but not too much to make you fall into a stupor and miss the last little bits of the weekend.

It's also another one of my ways of using up left over bits from meals in the week. I had some cheese sauce left over from my bake leeks last Sunday so I poured it into a freezer pot and kept it frozen knowing I can defrost it overnight in the fridge or quickly in a pan on the hob ready for a simple supper.

Recipe:

For the souffle:

Use the ramekin you want the souffle to fill when its finished to measure your cheese sauce, you will need about half a ramekin full of cheese sauce per finished souffle, you can always make more if you don't have left overs! Use the recipe here http://bit.ly/IJDeSE
1 egg per souffle
For the sweet red onion jam:

This recipe will give you enough for your souffles and some over, use it will cheese on crackers or in sandwiches with cold roasted meats.

2 red onions
2 tbsp balsamic vinegar
5 tbsp red wine vinegar
4 tbsp jam sugar

Start by turning the oven on to 180c.

I make the chutney first so that it has time to reduce and thicken whilst you make the souffles. Slice the onions up quite finely and fry in a little oil in a frying pan on a high heat, once they have softened and glistening splash in the balsamic vinegar, it will sizzle and fizz and reduce quite quickly which will make it sweet. When it has reduced to a sticky syrup pour in the the red wine vinegar and shake over the jam sugar, swirl the pan until the sugar has dissolved then turn down the heat to a gentle simmer and leave to reduce and thicken until its a deep glossy, claret red.

Now you can move on to your souffle, defrost or melt the saved cheese sauce or make a batch of cheese sauce following the recipe here http://bit.ly/IJDeSE. Warm your cheese sauce on a gentle heat in a saucepan and keep stirring it so it doesn't burn.

Crack your eggs, holding back the yolks and letting the eggs whites drain through your fingers into a very clean and grease free bowl. Plop the egg yolks into the pan of sauce and stir in, the mixture should thicken a little and become a little more golden. Take the pan off the heat and stand aside, using an electric hand whisk beat the egg whites until they are thick and fluffy and stand in stiff peaks when you pull the whisk beater out of the whites.

Using a silicon spatula fold the egg whites into the cheese sauce and yolk mixture ever so gently so that the puffiness of the whites is not lost.

Now take a heaped tablespoon of your sweet red onion jam and drop it into the bottom of your souffle pots. Then pour the souffle mixture into your ramekins, make sure you wipe around the tops and clean up any spills, you will serve the souffles in these dishes so it's nice if they look smart.

Bake the souffle in the oven until it has risen a good inch to two inches above the top of the ramekin and has formed a lovely golden brown crust on top.

Serve up with a fresh salad as a perfect Sunday evening supper.

baking

Pink grapefruit and mint drizzle cake

April 28, 2012

Sweet, soft sponge cake soaked in tangy, fresh grapefruit
syrup, all topped off with a crunchy, zingy minted sugar

If you fancy a bit of a bake this Saturday then look no further than my pink grapefruit and mint drizzle cake! All the softness of a classic sponge and the freshness of a lemon drizzle but with the sweet, zingyness of pink grapefruit and tinglyness of mint!
The inspiration for this cake came from a very odd source.. my washing up liquid! I use pink grapefruit washing up liquid and I've always loved the candy sweet scent that was cut through by a fresh clean menthol note so I took to the kitchen to experiment and the pink grapefruit and mint drizzle was born!


Recipe:

For the sponge:

4 eggs
230g caster sugar
230g self raising flour
230g margarine, I used Stork

For the drizzle:

the juice of 1/2 a grapefruit
3 tbsp caster sugar

For the icing:

the juice of 1/2 a grapefruit
about 6 tsp icing sugar

For the minted sugar:

2tbsp granulated sugar
small handful of fresh mint leaves

Turn the oven to 180c.

Because the sponge is going to be soaked in a sticky syrup I don't worry too much about making as light as other sponges, having a bit of a dense cake I find gives a richer syrupy finish. Don't get be wring I don't end up with brick-like puddings! But rather than whipping the egg whites separately before folding them in I use a very all in one approach to get my sponge made and in the oven.

In a large bowl, cream together the marg and caster sugar using an electric hand whisk, give it a good beating until the mixture is a lot paler in colour.

Crack in one egg at a time and sprinkle with a little flour before whisking this in, wait to crack in your next egg until the last and it's floury blanket have been completely mixed into the batter.

When you have a thick, creamy cake batter, pour it into a cake tin lined with greaseproof or baking paper. I used a loaf tin because I like to have the drizzle cake cut into slabs so that the ratio of crunchy mint to sweet sponge is just right.

Bake for about 30min, this could vary greatly depending on your oven and the flour and eggs... and quite honestly the tides and the moon. I baked mine for 30 mins then checked by lightly pressing the top and sticking a thin skewer into the centre of the load, mine wasn't quite done at 30 mins so it ended up having a total of 45mins with the last 10 being on a lower heat of 160c. You want your cake to have risen beautifully and be golden brown on top, if you fine that the size of the cake means that the top is colouring but the centre is still sloppy then turn the oven down low until the sponge is set but not cremated on top.

Whilst the cake is baking squeeze you grapefruit. To make sure you get the most juice out of it you can, before you cut it roll it around on a flat surface with a firm pressure form your palm. Split the juice into about half and half, it doesn't need to be exact. The reason I do half and half is that I like to have a good drizzle running through the cake but also a delicate, frosted topping of icing to the cake.

Into one half, pour your caster sugar, stir and leave to dissolve, stir every few minutes until its a clear, sweet syrup. In the other half of your juice mix in the icing sugar, you want a opaque icing that is the consistency of PVA glue, this is so it will drizzle from the spoon but set into a light, crisp frost on the top of your cake.

When you cake has baked, remove it from the oven and prick it all over the top with a thin skewer, you're better having lots of small holes that run through to the bottom of the sponge rather than fewer larger holes. They will be covered by the icing so don't worry if you think your cake now looks a bit holey. Whilst the sponge is still warm drizzle over the syrup so that it soak into the sponge. Leave the sponge to cool completely before drizzling the icing over the top of the cake otherwise it will melt and slide off the sponge.

Whilst you're waiting for the sponge to cool you can make up your minted sugar. Pour the granulated sugar and tuck your mint leaves into a pestle and mortar. Give them a good grind together until the sugar is a rich, emerald green and the leaves have completely melted into the sugar.

After you've done all of your drizzling and your icing has set into little rivers of shimmery sweetness, sprinkle over your jade sugar.

Cut into serious slabs and enjoy!

baking

Cheese melts

April 27, 2012

Perfect little puffs that melt on the tongue, a thrifty party nibble!

I love food and i love entertaining but it can a get a bit pricey creating delicious things every time we have people round. So I like to try and use up all the bits and bobs in the fridge, especially on a Friday to get ready for a new week of fresh food and new recipes. This recipes makes use of a little of the pasty i had left over from my St George's day pie and the cheese from my Sunday roast cheese baked leeks.

Recipe:

Puff pastry, homemade or shop bought it doesn't matter! I'm using the left over form my pie recipe which is about a quarter of what the recipe here makes http://bit.ly/KhbmVu
Grated cheese, how much will depend on how much pastry you have but you'll need to have enough to cover the pastry once it's tolled out, I used 150g.

Turn on the oven to 180c.

Lay out a large piece of greaseproof paper and dust it generously with flour, place your pastry in the centre of the paper. Dust the top of the pastry well then lay another equally sized piece of greaseproof over the top and roll out the pastry with a rolling pin until it is just a few millimetres thick.

Peel back the top layer of greaseproof paper carefully so as not to rip the pastry, pat back any tears or holes so that there aren't any holes. Sprinkle over a generous amount of cheese and pat it gentle into the surface of the pastry.

Now, take the edge of the greaseproof paper closest to to and fold it over so that about 1cm of the pastry is folded up onto itself. Continue to roll the pastry up tightly, smoothing it with the aid of the greaseproof paper until you have a tightly roll sausage of pastry. The size of the finished melts will depend on how thick the sausage is, I made a very ling thin roll so that my cheesy melts would be very small but I would have a lot of them, if you would rather larger melts then make the sausage shorter and fatter. Roll this sausage in foil and place in the freezer.

Let the roll freeze for about 4 hours, take it out of the freezer 5 min before you want to cut it to allow it to softened a little but not so much that cutting it will squash it. Slice the sausage into rounds that are about half a centimetre thick. Lay the rounds on a tray lined with baking or greaseproof paper and bake in the oven for 10 mins until the rounds have puffed and the cheese is bubbling and golden.

Allow them to cool then serve up alongside drinks instead of the sad looking packet of crisps!


recipes

Babaganush and lemon hummus with mini crostini

April 27, 2012

Perfect alongside weekend drinks, dip in and
load up a crostini with spiced babaganush or
tangy lemon hummus
These dips are so quick and simple to make, the hummus is the safe as a previous recipes but with the addition of loads more lemon juice to give it a really fresh tangy. This is such a refreshing change up form the usual creamy hummus its a great party dish alongside crisp white wine. The babaganush, with its roasted spiced flavours of cumin and coriander, is a wonderfully exotic addition to a party spread the fresh coriander also keeps it light and fresh.

Recipe:

This should make enough of each dip and crostinis to serve a drinks party of 4 on their own or 8 alongside other dishes.
Lemon hummus:
1 can of chickpeas
3 tbsp tahini, I use Al'fez, if you can't get tahini then crush 3 tbsp of sesame seeds in a pestle and mortar with a splosh of sesame oil
2 tsp finely chopped garlic
a few good lugs of olive oil
3 lemons
salt and pepper

Empty the can of chickpeas, minus the water, into a food processor or large bowl, dollop on the tahini or your home made sesame paste, sprinkle over the garlic and lug in the olive oil.
Blend or mash this together until they are well combined, now taste the mix and squeeze in the juice of the three lemons then season with salt and pepper, blend or mash until mixed and taste again.


Babaganush:

2 aubergines
1 red onion
2 tsp cumin seeds
2 tsp coriander seeds
2 tblsp tahini
1tsp finely chopped garlic
1 lemon
a good few lugs of olive oil
a handful of fresh coriander leaves and fine stalks
salt and pepper

Turn on the oven to 200c.

Slice the aubergine in half length ways and season the cut side with salt and pepper and rub the whole half in oil. Lay the aubergines cut side down on a foiled baking sheet and place in the oven to roast for about 20/30 mins, until the skin is wrinkled.

While they roast, roughly chop the onion and fry in a little oil with the garlic, coriander and cumin seeds. Fry until the onions are soft and sticky, then transfer the mixture to a pestle and mortar and grind into a dark, spicy paste.

When the aubergines are cool enough to handle, scoop out the flesh and drop it into a food processor, add the paste and the tahini paste and blend until mixed but still which lumpy.

Add the coriander leaves and fine stalks then blend again until its a bit smoother but try to keep some texture to the dip.

Taste the mixture and season with the lemon juice, salt and pepper.

Garnish with more coriander and serve in a shallow dish to allow for dipping.

Crostini:

4 small half baked baguettes, either make your own following the recipe here http://bit.ly/Iv2iMy or buy 'bake at home' baguettes
olive oil
salt and pepper

Turn on the oven to 200c, usually cook these in the bottom of the oven whilst my aubergines for the babagansh roast.

Slice the bread on an angle into rounds that are about half a centimetre thick. Lay these out on a large baking tray, try to make sure they aren't piles up on top of each other or they won't bake and become crisp.

Drizzle the slices with olive oil and season with salt and pepper.

Bake in the oven for a total of about 20-30mins, check them regularly and shake the pan, turning the slices so that they become an even and crisp golden brown. They may take less that 20 mins to cook depending on the heat of your oven and the thickness of the bread, just make sure that they don't get too dark or they will be bitter.

Serve up your crostini with these dips or others features on the blog with cold drinks on a Friday night to welcome in the weekend!

entree

Creamy mushroom risotto with garlic crumble topping

April 26, 2012

The garlic crumble topping gives a great crunchy texture
contrast to the oozy melting risotto and is a nice
alternative to soggy garlic bread
The risotto, whilst simple and easy peasy to make, is such a comfort food but it's prime characteristic, its melting, creamy, softness can make it a bit texturally bland. Liven up your beautiful risotto by topping it off with this lovely mushroom and garlic crumble, little pieces of crispy, garlicky crunch adorning the top of your glistening risotto will make it absolutely amazing!

Recipe:

Serves 2 with a 1 lunchtime portion for Charlie, or any other loved one you may have.

240g arborio rice
1 lt water
1 chicken stock cube
splash of white wine, about half a glass
80g dried porcini mushrooms
2 tsps dried tarragon
100g white mushrooms
1 red onion
20g parmesan cheese freshly grated or shaved
salt and pepper

For the crumble-

3 slices of stale bread, I used seeds bread which gave a really nice nutty flavour
2tsp finely chopped garlic
4/5 chestnut mushrooms, any mushrooms that look a bit more interesting are nice, like shitake
a large knob of butter

First you need to make your stock, I do this by taking a large jug, like one you would use to fill with a cocktail or juice. I know mine holds about a litre. Crumble your stock cube into the jug and pour in the porcini mushrooms, shake over the tarragon and fill the just with just boiled water (make sure your jug can take it!) to the top. Give it a stir and leave to stand whilst you get on with the risotto.

Finely chop the red onion and white mushrooms, I gave them a quick blitz in a food processor, that way they are done quickly and i get a nice erratic chop through them. Fry the onion and garlic in a little oil until soften in a deep frying pan for about 5 mins then tumble in your rice. Stir the rice around to coat in oil and continue to fry for another 3-4mins.

Splash in your white wine now, it should bubble and fizz away very quickly in the heat, when its disappeared, turn the heat on the pan down and pour in about a mug of your stock mixture making sure to hold back any of the porcini mushrooms. Stir in the stock, again is should being to disappear but less fiercely that the wine, the rice should also start to look as though it has a thin creamy coating on it and become a little stuck together. Continue to add mug fulls of stock and wait for it to absorb into the rice before adding more, make sure you hold back the mushrooms each time you pour the stock in.

When you get to the bottom 2 inches of stock, when the porcini are just covered by liquid take an electric stick blend or pour the last of the mixture into a blender and whizz until its a thick, chocolaty soup. Use this as you have used the stock, it will enrichen the risotto and make it a gorgeously rich colour with a very deep flavour.

Leave the risotto on a very low heat to continue to melt whilst you prepare the crumble. Using the food processor blitz the bread into uneven breadcrumbs, you can chop the bread with a knife but try and get an uneven mix of size so some are bite sized and some are like a fine sand.

Slice the chestnut mushrooms carefully so they keep their shape or if you are using shitake or oyster mushrooms just tear them in half or into thirds so they keep they nice shape. In another frying pan melt the butter and shake in the garlic, let it fizz for a couple of seconds then throw in your mushrooms, stir them through the garlicky butter until they are coated and begin to sizzle. Now pour over your breadcrumbs, they will look like a big soggy mess for a while but keep them spread out of the pan and give them a shake every few minutes, as they fry they will become golden and crispy and more separate.

To serve your risotto season to taste with salt and pepper, then spoon a good portion of rice onto the centre of a deep plate and allow to melt into the plate, sprinkle over some of your garlic and mushroom crumble then shave on some fresh parmesan... enjoy with a really crisp, cold glass of white wine, or two!


baking

Fruity flapjacks

April 25, 2012

All wrapped up in the brand new 'Holly likes to cook' packaging!
I love flapjack, it gives me (an often) much needed mid morning boost and serves as a great breakfast if I'm dashing out the door. Whilst they are quite sugary the oats give slow release energy to prolong the quick burst you'll get from the sugar and the fruit is delicious and chewy, making little pockets of natural sweetness.

Recipe:

Makes 16 bars.

200g butter
200g dark soft brown sugar
5 tbsp golden syrup
150g dried fruit, I used a mixture of cranberries, strawberries, sultanas and apple
250g oats

Set the oven to 180c.

Before you start find a baking tin that is about an inch deep, 30cm long and 20cm wide, line this with baking or greaseproof paper, it will be what you pour your oat mixture into and the final shape of your flapjack. If you prefer a 'cake slice' shape for your flapjack then use a round tin, use anything you like really but make sure its about an inch deep so your flapjacks remain chewy and not like a biscuit.

Cut the butter into a saucepan and pour in the sugar, spoon in the golden syrup and melt together for about 5 mins until you have a glossy, dark golden brown molten mixture. Do be very careful as it will very incredibly hot and sticky, so if you drop it on yourself it will stick and burn!

In a separate bowl whilst your syrup mixture is bubbling away mix together your oats and dried fruits. If the fruits are a bit big, like the apple slices I used, chop them into bite sized pieces so that when you chomp into your flapjack you don't end up with it attached to your face via a stubborn piece of dried apple.

I used fruit in these bars but you can add anything you fancy: fruit, nuts, chocolate, seeds.. the world is your oyster, or flapjack really.

Once your syrup mixture is a dark glossy brown, carefully pour it over your oats, using a silicon spatula scrape around the side of the pan to get all the lovely buttery syrup out. Then mix the liquid into the oats well so that they are completely coated and sticky.

Tumble the syrupy oats into your lined tray and using a second bit of greaseproof paper, smooth down the surface of the oats. Make sure there are no thin bits sticking up at the sides of the tray, they will burn on the oven and make the finished flapjack bitter.

Pop in the oven for about 20-25 min, check after this time that the sides have coloured a little and come away from the paper as one 'wall'. What I then do is turn off the oven, take the flapjack out and flip it upside down onto another baking tray lined with paper, this one doesn't have to have side at all. I then leave the flapjack in the cooling oven so that the bottom of the flapjack gets a little hardened, I find this gives a great chewy crust to all the bars rather than just at one end of them.

When the oven has cool, removed the flapjack and cut in half length ways and in half width ways. Then cut each of the quarters in half width ways again, and in half again. This will give you 16 finger shaped bars of flapjack, perfect for a mid morning boost but not too much as to give you a sugar overdose.. unless you eat more than one.


recipes

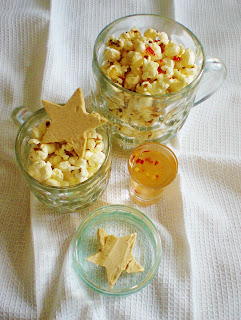
Chili syrup popcorn and whipped cinnamon butter popcorn

April 24, 2012

Sweet and savoury popcorn snacks, perfect for a mid morning
munch or a a party nibble
Charlie and I went to Cheltenham this weekend and on the advice of our lovely friend Harrie and had lunch at The Tavern on Royal Well Place. Their website is http://thetaverncheltenham.com/ where to can find out a little bit more about them and sign up to their mailing list. This place was brilliant, having recently undergone a make over the atmosphere is relaxed trendy, with reclaimed vintage decor including a 6ft union jack on the wall and old classroom chairs and stools. The staff were friendly and knowledgeable about the tasty morsels on the menu, recommending with honesty and enthusiasm when asked.

As we sat down we were given some popcorn to snack on as we made our choices for lunch, it was drizzled with a lovely sweet chili sauce which I have tried to recreate below. I've also listed a lovely whipped cinnamon butter of my own making that I like to melt over popcorn when watching a movie on a Saturday night or a glass of wine with the girls!

So a massive thanks to The Tavern in Cheltenham,, if you are in the area I would definitely recommend it, but if you can't get there then this is my interpretation of their chili popcorn.

Chili syrup recipe:

400ml water
150g caster sugar
salt
1 red chili

Pour your water into a pan on the hob on a high heat and bring to the boil, shake in your sugar and swirl the pan until it dissolves. Turn the pan onto a heat that's high enough to keep the syrup bubbling but not so much that it will boil over.

Whilst the syrup is bubbling, finely chop your chili. Slice a little off the pointy end of the chili to test the heat of it, my chili wasn't too fierce so I chopped it all up including the seeds. If your chili is very, very hot then only add half of it and leave out the seeds.

When the syrup has reduce by a third add your chili and swirl the pan around, continue to bubble the syrup until it has reduced by another third and its done. You should have a beautiful crystal clear syrup with a slightly orange tint, flecked with flake of bright red chili.

Allow the syrup to cool a little so when you pour it on your popcorn you can actually pick it up ans eat it without burning your finger! Drizzle it over warm freshly popped corn.

Whipped cinnamon butter recipe:

50g salted butter
2 tsp ground cinnamon
2 tbsp icing sugar

Pop the butter into a non metallic dish and warm in the microwave for 20 seconds, you don't want the butter to be completely melted just warmed and softened so it's easy to whisk.
Sieve the cinnamon and icing sugar into the bowl and whisk until light and fluffy with an electric hand whisk. The butter will be coloured by the cinnamon but will become a lot lighter in colour and have doubled in size when its ready.

You can dollop this straight onto your warm popcorn, however to make it looks a bit special for a party you can make whipped butter stars.

Spoon and smooth the butter into a small tupperware dish that's been lined with clingfilm and put it in the freezer for 10 mins. The butter will have hardened enough for you to use a cookie cutter to create star shapes or any shapes you like. Place these shape on top of warm popcorn and allow the butter to melt and run though all the knobbles of the popcorn... delicious!

baking

Eton Mess

April 23, 2012

A truly English classic dessert.. who can't help but love fluffy
meringue, silky whipped cream and sweet, sweet strawberries?
... not me!

This dessert is always a crowd pleaser, it's so simple and can be prepared in advance for a special meal then, literally!, thrown together in minutes. You will need to make your meringue the day before you need it as it should be left to dry out in a warm oven over night.

Recipe-

This would easily make 4 nice dinner party portions or 2 very greedy Monday night in portions

For the meringue-

6 egg whites, i used the whites from the eggs used in my Carbonoli recipe, I whipped up the meringue on the day then kept it in an air tight container until I needed it
300g caster sugar

For the mess!-

small tub of double or whipping cream
1 punnet of strawberries
2 tbsp caster sugar
a small handful of mint leaves.

Put the oven onto a very low setting, about 100c.

To make your meringue, which you can do days in advance, you will need a very clean and dry bowl. As I explain in a previous recipe, egg whites need to be whisked in a very clean and grease free bowl or they will not fluff up. Use an electric hand whisk or you will be whisking for ages and end up with a very sore arm, begin to whisk the eggs, when the bubble become smaller about the size of cous cous, pour in about a third of the sugar and continue to whisk. when the sugar has been mixed in add another third and repeat until all the sugar is gone. Continue to whisk the whites until they become a very thick, stiff, glossy foam.

You should be able to turn the bowl upside down without the whites dropping from the bowl, however if you bowl is make from a very smooth shiny material like china or metal they may slide so be careful! To be sure that they are ready pull the hand whisk beaters up out of the foam vertically creating a peak in the whites, the peak should stay standing.

Tip the meringue out on to a tray lined with greaseproof paper and smooth with a spatula. You can make mini individual meringues but for an Eton mess I make a large meringue so that the inside becomes all chewy and soft, then when I crumble it for the mess there is a real mixture of textures.

Pop the meringue into the oven for about three hours, I usually bake the meringue in the evening then when the three hours are finished I turn the oven off but leave the meringue in the oven to continue to dry out as the oven cools.

When your meringue is completely cooled you are ready to make your mess, I cut 2 inch rounds out of the meringue to act as a base for my Eton mess, this is not necessary but helps to keep it a bit neater if that's the look you're going for.

Crumble the rest of the meringue so you have a good range of sized pieces with the largest being no bigger than a 2p coin.

In a pestle and mortar pound the caster sugar and mint leaves until the sugar is a beautiful emerald green colour and the leaves have completely dissolved.

Choose four of the less pretty of your strawberries, chop them roughly then put in small bowl with the minted sugar, stir so that the strawberries are coated then leave to stand whilst you chop up the rest of the strawberries. Return to your sugary strawberries they should have become a bit squashy now and a fork will easily mash them into a coulis.

Whip your cream until it is dollopy and puffed, then fold in your meringue and chopped strawberries, give the mixture a few folds until its muddled but still quite erratically mixed. Pile the mix onto one of the meringue circles cut out earlier or straight into a bowl then drizzle over your coulis so that is streams down through the folds of the cream mess.

Enjoy as a truly indulgent treat on St George's day!


entree

Steak and Wye Valley Brewery ale pie

April 23, 2012

For St George's day- Steak and ale pie made with English Wye Valley Brewery
ale.. with a union jack crust as a nod to the Scottish beef I used and the Welsh location
of my kitchen!

This pie is a really nice winter warmer, and although we're well in to Spring the April showers are making me feel a bit wintry! Prompted by St George's day, I wanted to make a real English classic and after a bit of a vote, steak pie came out as a real English favourite. The ale I've used in the pie is another Pengethley Farm Shop purchase, it's blonde pale ale from Wye Valley Brewery called HPA- Hereford pale ale. Its a lot lighter than many ales I've had before and creates a really rich sauces for the steak with slightly sweet honey type notes on the palate. The pie is topped with proper puff pastry, now I have nothing against buying puff pastry for day to day cooking but when its something special it's really nice to know you've made it all yourself.

Recipe:

Make 2 individual or one large pie for 2 people, plus some left over pastry which can be frozen.

For the filling-

400g stewing steak
4/5 big white mushrooms
1 red onion
1/2 tsp finely chopped garlic
a splash of balsamic vinegar
1 500ml bottle of ale (minus one swig to make sure it's safe to use.... )

For the puff pastry-

110g plain flour
15g lard
75ml cold water
75g butter
pinch of salt

The cooking method for the filling of this pie is low and slow, the stewing steak needs time to become meltingly tender and for the fat in the meat to render into the sauce. So I start the cooking in a cast iron or oven safe pan with a lid then transfer it to a low oven for a good couple of hours.

Take the butter than you intend to use in your pastry out of the oven and place it near to the hob, not so that it will melt but just to bring it up to room temperature by the time you've finished preparing the pie filling.

Roughly chop the onion and the mushrooms then drizzle a little cooking oil into your pan on a high heat and add the garlic. Give the garlic about 30 seconds to infuse into the oil but not to colour in the heat then add the onions and the mushrooms. Give the vegetables a stir then leave to fry, checking on them occasionally whilst you chop your stewing steak. Some stewing steak will come pre-cut which is fine and save times, if you need to cut your own then make sure you cut it into really chunky bite sized pieces, you want the steak filling to be really meaty with a good texture rather than a meat sauce.

When the mushrooms and onions have become soft and translucent, add your steak and turn it over a few time to colour. The steak and mushrooms will release a lot of natural juices, I like to add the steak after the vegetables so that it become infused with this mushroom juice. Cook all of the natural liquid away on a high heat and continue to fry the beef, onions and mushrooms for a further few minutes to give the beef a good golden colour.

Once the beef is well coloured splash in a little balsamic vinegar, this will bubble and reduce quickly to a syrup. The vinegar give the finished filling a very rich note whilst cutting through the heaviness of the beef. Now add in half of the ale, it will bubble up from the heat and it own fizz, let this die down a little then turn the heat down low and leave to bubble.

Turn your oven on now to 150c, by the time it has come up to temperature the steak filling will be ready to be covered and popped in the oven. For me this is a dish that is not done in a rush, either on a Sunday or when I'm doing a special meal, I like to give it a good two hours in the oven to really get all melty and delicious. Check it about half way through the cooking time and add in the rest of the ale so that the meat remain covered in liquid, make sure you do this with a good hour still to go in your cooking time so that the ale has time to reduce and sweeten.

Whilst your pie filling is cooking you can prepare your pastry, again this is not a quick recipe, though it's not particularly tricky or time consuming in its actual preparation there is a lot of hanging about in between folding.

Pour your flour into a large bowl and sprinkle over a pinch of salt and break in the lard, using your finger tips crush the lard into the flour until it is all crumbly like wet sand. Add in the water bit by bit until the crumbs form together in a dough, kneed the dough just enough to bring it together in one dough ball but not too much or it'll make your finished pastry tough.

Encase your dough in clingfilm and pop it in the fridge, it needs to be left for half an hour.. but I'm a bit impatient with chilling dough so i put it in the freezer for 5. I have not found this to affect the finished dough but do not forget it is there of you'll have to wait for it to thaw which will take even longer than putting it in the fridge in the first place!

Whilst your dough chills, lay out a 30cm length of greaseproof paper on a flat surface. Place your butter on top of the paper then over with another piece of paper of equal size. Now using a rolling pin press and roll out your butter between the two sheets of greaseproof until you have a sheet of butter about 1/2 a cm thick. If your butter is not very yielding then use the palm of your hands to smooth it out, the warmth of your palm should soften the butter enough to make it a little more willing.

Take your dough out of its cold resting place and roll out until about 1 cm thick, place the butter sheet in the centre of the pastry. If the pastry is larger than the butter sheet, fold the edge of the pastry up over the butter so it's well tucked in. Now fold the dough as you might a letter, in three sections, fold the right hand side over so that it doesn't quite reach the left side then fold the left side so that it meets the new folded edge on the right hand side.

Cover your pastry with its butter filling with clingfilm and chill again, the pastry needs to feel quite stiff and cold before you roll it our again.. choose your chiller the fridge or the choice if yours!

When the pastry is chilled remove it, three-fold and roll it out then three-fold it again, return to the chiller until stiff. Repeat this process at least 3 times, the more time you do the more layer of butter you will dispersed through your pastry and the lighter and crispy it will be when baked. I usually do this about 4 or 5 times to get a good light pastry that rises nicely.

To build your pie spoon a generous portion into a nice pie dish then cut a pieces of pastry to cover the top, brush the rim of the pie dish with egg or milk to create a seal. Then place the pastry over the top of your filling and pat down the sides of the pastry so it's stuck well. Use some off cuts of pastry to decorate the top of your pie, aside form looking nice it means you get to eat more butter pastry!

Bake in an oven at 180c for about 20-30 mins depending on the thickness of your pastry, it needs to be golden and puffed up beautifully. Serve with mash or chips with a lovely fresh green vegetable for a really great patriotic dinner!


entree

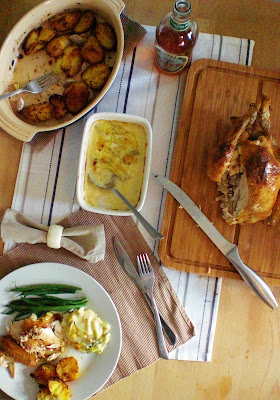
Roast chicken with pine nut, bacon and sage skin-stuffing with a cider gravy with leeks baked in 'Little Hereford' cheese sauce

April 22, 2012

A proper Sunday roast! serve up crispy garlic and rosemary
roasted potatoes and some fresh steamed vegetables
Nothing makes a Sunday like a proper roast dinner, lovely juicy meat with crispy potatoes. Chicken is fab if you fancy something a bit lighter and there's usually some meat left over you can save for sandwiches or a risotto later in the week. I visited my soon to be in-laws this weekend and took advantage of the local farmers market; I picked up a great cider made from Herefordshire apples called Yarlington Mill brewed by Gillow Cider in Ross-on-Wye their website is www.gillowcider.co.uk where you can find out all about them and their range of drinks. I also got my hands on a beautiful cheese called 'Little Hereford' made by Monkland Cheese Dairy, find them at www.mousetrapcheese.co.uk which goes so well with the baked leeks. Both these beauties (and the ale I'm going to use in tomorrow's recipe) were from the Pengethley Farm Shop, www.pengethleyfarmshop.com, in Peterstow just outside of Ross-On-Wye, a gorgeous little gem of a shop that stocks loads of local bits and bobs as well as a few specialist little things.

Recipe:

I made this recipe for 2 people and will have loads of left over chicken to use in the week, so all the quantities are suitable for a small chicken for 2 people.

The chicken-

1 chicken, try not to scrimp on the chicken if you can, food is expensive but when it comes to meat I do like to try and make sure its good quality.
50g salted butter
3 rashers of dry cured bacon
6 large fresh leaves of sage or 1 heaped tsp of dried sage
3 tbsp pine nuts
pepper
250ml cider, I used Gillow Cider's Yarlington Mill

The leeks-

150g baby leeks, you can use normal sized leeks but the baby ones look really nice for a special dinner
25g butter
2 tbsp plain flour
200ml milk
65g cheese, this is where I used my 'Little Hereford' cheese

Turn the oven on to its highest setting, for me this is 230c

To make the stuffing for your chicken snip the bacon into little pieces, I use scissors to make this quicker but you can use a knife and board, into a mixing bowl. If you are using fresh sage, snip this over the bacon or sprinkle over your dried sage. Pour your pine nuts into a pestle and mortar and using a pounding action squash the nuts until some have become a chunky powder but some remain whole, this will give you a lovely varied texture. Tip the pine nuts into the mixing bowl then add the butter, it will be easier to mash together if you've softened your butter in the microwave for a few seconds before hand. Mill some fresh pepper into the mixing bowl then crush the stuffing together with a fork until it's a well mixed paste.

Place your chicken in front of you with its bottom facing you, if it's trussed up with elastic or string then cut the ties and pull the legs apart a bit so you can get to where the skin of the breast finishes before the cavity. Using your fingertips peel the skin away from the flesh of the breast of the chicken, push your fingers down across the breast until there is a large pocket between the skin and the flesh over the entire top of the chicken. Stuff two thirds of your butter mixture into this pocket, to make sure its evenly spread smooth the skin back over the stuffing and press the lumps out with you palm until he butter has been push down across the entire breast and there is an even coating. Using a very sharp knife make a slice in the skin on the drumstick as close to the end of the leg as possible, prise the skin away from the meat on the legs and repeat the stuffing process with the remaining butter mix on both legs.

The butter sitting under the skin like this will baste the bird whilst protecting the meat from the fierce heat of the oven, giving you a beautifully moist, succulent chicken with golden, butter, crisp skin dotted with salty bacon and creamy pine nuts.

The chicken should be cooked according to the timings on the packaging, if there aren't any timing instructions then this is a pretty good rule for how long to cook and chicken:

20mins for every 1 lb or 450g the chicken weighs plus an extra 10 to 20 mins


You then need to make sure it's cooked by piercing the thickest part of the chicken, between the drumstick and the breast, and watching for the colour of the juice that runs out of the piercing. It should be perfectly clear but not at all pink or red.

Use a metal pan to roast the bird in if you have one as this mean you'll be able to then put the pan directly on the hob later to make the gravy.

I like to start the chicken off in a searing hot oven for half an hour to get the skin initially crisped and the colour started. then i turn the chicken down to about 180c for the rest of its cooking time. When I turn the chicken down I splosh the cider into the bottom of the pan, all of the chicken juices and fats will run into the cider making the beginnings of a lovely silky gravy. Take the chicken out when its finished cooking, cover it and leave it to rest for 10 mins while I gather all the other bits of the meal together, then throw it back in the oven for 5 mins on the highest heat in a clean, dry pan to make sure that the skin is really crisp when I serve up.

By putting the chicken into another pan for its final burst of cooking it ensure that no moisture is around the base of the chicken to steam and soften the skin and also give me the original roasting tin to make my gravy in.

Place the roasting tin directly onto the hob and turn it up to a medium heat, bubble the juices that are in the roasting tray and use a whisk to scrape off and mix in any sticky bits of chicken juice that have stuck to the bottom of the pan. If you don't have much juice in the pan, turn the heat up very high under the tin and splosh in a little more cider or some water to loosen the sticky residue, this is called de-glazing the pan. If you need to thicken your gravy do this mostly by reducing it by bubbling it away but you can add a dusting of cornflour to the hot mixture to thicken it a little quicker. Season the gravy to taste with salt and pepper.

To make your leeks, which I would do during the cooking time of you chicken, first slice about an inch off the top of them. Then slice them in half length ways and pop them into a non metallic dish with a tablespoon of water sprinkled over them, cover with clingfilm and microwave for 3-4 mins. This will blanch the leeks and tenderise them before baking. My nearly mother-in-law turned me on to microwaving vegetables, by covering them with clingfilm and putting a little water in with your veg microwaving the them steams them while trapping in all the goodness and flavour. A big thanks to Miranda for this little kitchen gem xxx.

While the leeks are steaming, put the butter into a saucepan and melt it gentle. When it is melted sprinkle over the flour and turn up the heat under the pan. Whisk the butter and flour mixture until its become a golden paste, it may be lumpy but do not worry, pour over a little of the milk and continue to whisk them paste should melt into the milk and become a thick sauce very quickly, add a little more of your milk whilst stirring, wait for it to thicken then continue to add milk until its all gone. This is your basic white or bechamel sauce, grate your cheese and add all but a generous pinch to the sauce and whisk in until melted. The pinch you save will be scattered over the top of your finished dish to brown in the oven.

Lay the blanched leeks in an ovenproof dish, if you are using the same dish as they were steamed in make sure to drain off the water or you'll have a very sloppy bake! Pour over the cheese sauce then sprinkle on the reserved cheese. This needs to be baked n the oven for about 20 mins at about 180c so I usually keep it aside until the last 20 mins of the chicken's cooking time so it's all ready in one go.

Serve up some sliced chicken breast or whole legs and wings with some crispy roasted garlic and rosemary potatoes, a good generous pile of your bake cheesy leeks and some fresh steamed (in the mic!) vegetables all topped off with your gorgeous cider gravy. Gather up the pine nuts and bacon bits that will invariably escape as you carve and scatter them over your chicken for the perfect Sunday roast.


baking

Teeny tiny Victoria sponges with a buttercream and homemade vanilla and strawberry jam filling

April 21, 2012

These little sponges are absolutely beautiful and as they
are so little you can eat a whole cake by yourself and not feel
too naughty!

You can now get baking tins that have individual sponge indents with straight edges and removable bottoms, however I haven't used one and there is a very good reason for it.

By making your own jam to fill these little babies you also are likely to be left with a nice little pot of 'leftover' jam.. and it would be a shame to see it go to waste so spoon it onto scones (not blue cheese!) with cream or have it on your morning toast!

Recipe:

I'm a big fan of the 4,4,4,2 method of baking sponges as my mum taught me so I've doubled the quantities for this recipe to give me two sponges for my tops and bottoms.

For the sponge-

230g caster sugar
230g baking margarine, having used butter in the past I find that the cake becomes a bit
hard if it gets too cold, margarine says nice and moist and makes a lighter sponge
230g self raising flour
4 eggs

For the buttercream-

150g salted butter, the salt in the finished butter cream adds a real depth to the buttercream and make its richer and more indulgent.. there's only a little bit on each cake so you can afford to be very generous with your flavours!
300g icing sugar, this is guide, to be honest I rarely weigh the sugar I just make it to taste and texture, you'll know when it's right

For the jam-

1 punnet of strawberries
equal weight of jam sugar to strawberries
a splash of water
the husk of a vanilla pod, I keep my vanilla pods after scraping out the seeds for custards and the like so I usually have a 'used' pod lying about, if you don't I would slice a pod through the middle lengthways and just use one half, the vanilla adds a warm note to the jam but the strawberries are so sweet that the addition of a whole vanilla pod would be lost amongst the sticky sweetness of the berries.

Put the oven on to 180c.

To make the sponge I cream together the margarine and the sugar with an electric hand whisk in a large bowl so I have plenty of space to move the mixture around. Whisk the margarine and the sugar until it has become considerably paler than the original shade of the the marg, keep a tsp of marg aside to check if you wish! This lightness of colour shows that the mixture has been aerated and will be fluffy and light.

Find another largish bowl and wash and dry it thoroughly to make sure there is no trace of any grease in it at all, they will get greasy just being in a cupboard in the kitchen. You want to crack your eggs over your beautifully clean bowl, holding back the yolks in lightly clasped fingers, a bit like one of those grabby cranes at a fair ground! Let all of the crystal egg white drain through your fingers, help it through by pulling at it with your other hand but make sure you do not crack the yolk. Drop the yolks into the bowl with the marg and sugar mixture as you break your eggs.

Now whisk your egg yolks into your marg and sugar mixture, adding in a sifting of flour every few minutes, as soon as your last sifting is no longer visible add a bit more. The mixture will probably feel very thick and heavy at this point but do not fret that will soon change.

Wash the whisk beaters thoroughly and dry them making sure they are completely grease free. This pedantic grease eradication is so that when you whisk your egg whites they blossom into fluffy white peaks... grease is the enemy of clouds of egg white, they will remain stubbornly flaccid and sloppy should any grease be lurking in the bowl or on the beaters.

Using the beautifully clean electric hand whisk, whip the egg whites into a bubbly frenzy until they resemble a large and pearly 99 ice cream in your bowl. Now, take a large spoonful of your stiffened egg white and gently pour it into your marg, sugar, yolk and flour batter, using a spatula fold the white foam into the batter until it has disappeared, repeat until all of the egg white is gone. Some recipes say to use a metal spoon as its sharp edge cuts through the batter without knocking any of the air out, I use a silicone spatula as I find it eases all of the mixture away from the sides of the bowl and make sure its thoroughly mixed.

Line two square or rectangular baking tins that are about an inch deep with greaseproof paper. Divide the mixture equally between the tins and smooth over with the spatula, do not bang the tins to level the mixture or you'll lose all the air you've spent ages putting it to the cakes!

Place on the middle shelf of the oven and bake for about 20 mins, then check. The cakes should be lightly coloured on top, a golden brown, and slightly firm to the touch, bouncing back when a finger is pressed lightly against their surface.

Leave the cakes until they are very cool, you can make your buttercream and jam in this time, and you can't ice your cakes until they are cold anyway as the buttercream will melt and slip off.

Before you make the jam put a saucer and a large dinner plate in the fridge, then cut the stalks off your strawberries and half them, if there are any giants then chop them into quarters. You want a bit of texture to your jam so dont cut them up too small or they will just dissolve and you'll end up with more of a jelly.

Tumble the strawberries into a high walled frying pan or a saute pan and splosh in enough water to half cover the strawberries. Turn the heat up high under the pan and bring to the boil, then turn down to a simmer for the strawberries to stew. After about 5 mins shake over the jam sugar and throw in your vanilla pod, rather than stirring the mix, which will make your jam cloudy, swirl the pan around to dissolve the sugar. Leave this to bubble and thicken for about half an hour, occasionally scooping off any creamy foam that appears on the surface this will again make your jam cloudy.

When the jam is thick and a very deep, jewel red colour take a tea spoon of jam and dab it onto the cold saucer from the fridge. Within second it should firm up into a recognisable jam consistency, sticky and thick. If it is still too drippy then cook for a further 10 mins, if after this time it is still too loose add two more tablespoons of jam sugar and bubble for another 10 mins.

If your jam has passed the cold plate test then pour all of it onto the large dinner plate, move it about a bit with a spoon to cool it a little then pop it in the fridge to become completely cold. If you don't intend of using the jam immediately it can be put into sterilised jars to cool, this will create an airtight seal. But if you want to use the jam to finish your cakes on the day then use the plate method to cool is considerably quicker.

To make the buttercream icing, use your electric hand whisk again to cream together the butter and icing sugar. Like with the margarine, you should whisk the butter until it has lightened considerably in colour, this will be more obvious with the butter than with the margarine. Make sure you taste the buttercream and adjust the amount of icing sugar until it is just perfect.

To build your Victoria sponges you must wait until the sponge is completely cold, then using a 1 1/2 inch circle cutter cut out as many sponge rounds as you can get from the trays. I managed to get fourteen circles which eventually made seven finished Victoria sponges. The offcuts of sponge can be kept and frozen for use in further recipes, one of which I will be posting in a few weeks' time for a certain monarchs birthday.. any guesses?

If one of your trays was a little deeper than the other make sure that all your bottoms are from one tray and all your tops are from another, this way the sponges will not only all be the same height but will also look a lot more uniform when finished.

Spread a cake bottom round with a good thick coating of buttercream, be generous they are only little, I aim for about 1/2 inch. Then dollop on a heaped teaspoon of your cooled jam into the middle of your buttercream, don't try and spread it out as it'll mix into the butter cream rather than remain as two separate layers. Taking a top cake round, press it onto the jam, this will spread it out and ensure the top is glued on tightly and won't fall off your finished cake which just wouldn't do.

Repeat this will all your tops and bottoms them dust with icing sugar, if you are going to store or transport your cakes then hold off on your dusting as the moisture in the cakes will make the icing sugar go translucent rather than powder soft and snowy.

Enjoy with a lovely cup of tea!