eat

Blessed are the Donut Makers: Q+A with Lori Kettelle of PVDonuts

April 30, 2016


Providence has been invaded. By donuts.

Led by Lori Kettelle, PVDonuts has exploded onto the food scene here in Providence. But these aren't just any donuts, these are PVDonuts. Written in big red letters on any confectionary lover's calendar, is a mustn't miss appointment every Saturday morning, at a select few location across Providence where these monster donuts can be acquired.


Lines are forming well before opening time at the doors of Coastal Roasters, Malachi's Cafe, Angelina's and Stock Culinary Goods, with crowds of eager people keen to grab their donut (or donuts) for the day.

I got myself along to Stock Culinary Goods, as it's so conveniently located in my 'hood', in type A fashion: half an hour before opening time.


Chief donut delivery chap Paul (Lori's husband, who quite rightly and adorably recognizes that his main role at PVDonuts is to 'Make Lori's life easier however I can!') delivered the precious cargo right on time, just dodging the hungry hoards. This week's selection included: Vegan Strawberry Glaze, Lemon and Poppyseed, and Vanilla Glaze.

Though PVDonuts offer both old fashioned and yeasted varieties, all of these were hulking great yeasted varieties, and each about the size of my face.


After snagging one of each, and a coffee from Seven Stars up the street because we all know a donut's best mate is a coffee, Charlie and I hustled back home with what felt like our black market score, to chow down and ultimately become complete converts to the PVDonut cult.


Huge, soft and fluffy on the inside, with a satisfying slight crisp to the shell from both the glaze and the golden crust, the donuts earned an 'A++ would buy again' from us both. Even my sweet-toothless husband could help going back in for bites of all three, which was probably a massive over ordering on our part, because these 'nuts are massive.

Whilst the Strawberry Glaze, topped with dehydrated strawberry chips was delicious, the slightly heavier texture of the vegan recipe meant that the Lemon and Poppy Seed pipped it to the post for our joint favourite.


I managed to catch up with Lori to ask her a bit about her donut making, flavor creating, and bricks and mortar accommodating (eek!):

Are you from Providence originally? If not, when did you arrive in the ocean state?

I am originally from New Jersey, and I arrived here in 2008 for college. I graduated from  the P4 program at Johnson & Wales in 2012.

What inspired your love affair with donuts and when did it begin?

A couple of years ago my husband and I traveled to Portland, ME and discovered The Holy Donut. We'd find excuses to spend weekends in Portland just to go there (no shame), and would be bummed when we got back and there was nothing like it close by!

What made you decide to start PVDonuts? What there a particular moment when you knew your calling was to bring donuts to the good people of Providence?

Simply put: Providence needed a gourmet donut shop. I think a lot of people had been wondering when it was going to finally happen - myself included - so I figured, "Hey, why not just do it?" I started R&D almost two years ago because it was really important for me to develop the right recipe.

What drives your flavour profiles? Do you use local ingredients?

The seasons drive my flavour profiles - I want to be able to switch it up as the seasons change so that in addition to core donut offerings, we have seasonal offerings. We've worked with a few, but as we transition into our new location, we'll be looking to establish new partnerships (hint, hint).

Can you give me any more details about the soon to be bricks-and-mortar store? Is there a particular part of PVD you'd love to be in? Where do you make the donuts right now?

Right now I produce out of Hope & Main in Warren, RI. They have been incredible over the past 6 months in helping me get off the ground. Our location will be at 200 Allens Ave in Providence. We'll be moving into the cafe at Sin - it'll be a co-branded effort at first, but as they transition out of their space, we'll eventually take over.

I know you supply donuts to some select local stores on the weekends and offer wholesale- how do people get in touch if they want to order? How do you price your wholesale?

People can fill out the contact form on the bottom of our website (www.pvdonuts.com) if they're interested! However, we are putting private and wholesale orders on hold until we've settled into our new space. We want to make sure that everything is good to go for opening day!

What's your favourite donut flavour? 

I haven't made it yet, but chocolate sea salt glazed is my favorite, and we're going to be developing that recipe soon.

When you're not making donuts what do you like to do?

Honestly, I love napping. If you know anything about bakers hours, they are a far cry from the usual Monday - Friday, 9-5 kind of job. Otherwise, I love to travel, try new places to eat, and spending as much time with friends and family as I can.

What is your favourite food hangout in Providence right now?

My favorite food hangout in Providence is The Ivy Tavern on Hope Street. My husband and I go there once (sometimes twice... or thrice) a week. The food is incredible, and consistent - and how can you say no to the bibimbap, fried wings, and garlic fries?

Essential tip for eating a donut without getting hella sticky?... or isn't there one?!

Screw it, just enjoy the damn thing ;)!

Find PVDonuts online at pvdonuts.com, on Instagram & Facebook, and be sure to join them at their Grand Opening on Saturday May 28th at their new location: 200 Allens Avenue, Providence.

breakfast

Totes Toast: La Brea Bakery

April 28, 2016


Toast glorious toast! A breakfast staple, the humble toast hides its light under a bushel when it comes to its versatility.

A couple of weeks back I posted a recipe:

"A TWIST ON A CLASSIC COMFORT FOOD DISH: ROASTED PEPPER & TOMATO SOUP WITH BAKED ‘GRILLED’ CHEESE CROUTONS"


I cooked this recipe live on The Rhode Show, and when 'National Grilled Cheese Day' popped up a few days later I couldn't resist shouting all about my decadent grilled cheese recipe on twitter:

This caught the eye of La Brea Bakery who very kindly offered to send me some bread so I could keep up my carb addiction.

Wanting to do something simple with these awesome rolls to showcase their delicious flavour, but also give them a really special twist, I though some fancy toast toppings would be just the ticket.

Here are my favourite toast toppings that don't need to be confined to the breakfast table:


Ricotta with Minted Smashed Peas


Smother your toast with whole milk, full fat ricotta and top with smashed peas and freshly chopped mint- season with salt to bring out the natural sweetness of the ricotta.


Smoked Salmon with Radishes and Lemon

Slick a light coating of cream cheese on to the toast then top with smoked salmon (make it pregnancy friendly by pan frying your smoked salmon and having this treat hot!). Thinly slice the radish and lay over the salmon, then grate over lemon zest for a zingy finish.


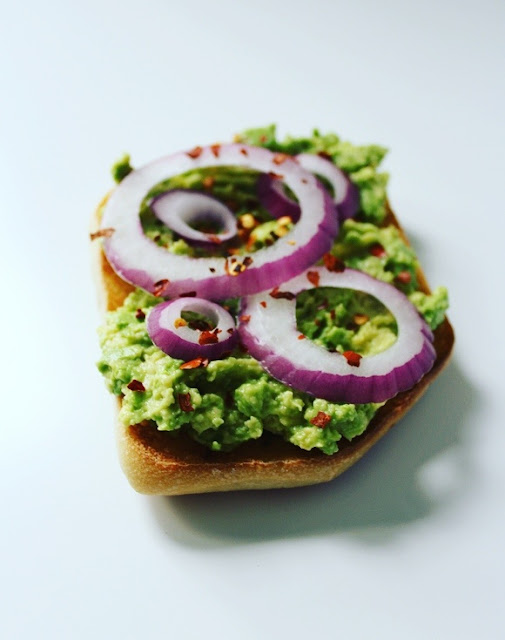
Avo Toast with Red Onion and Chili Flakes

The new classic, avocado toast is rich and creamy yet full of goodness and perfect for a morning energy boost, light lunch or snack. Mash ripe avocado with salt and pepper and smoother over the toast, top with slices of red onion and a shake of chili flakes.


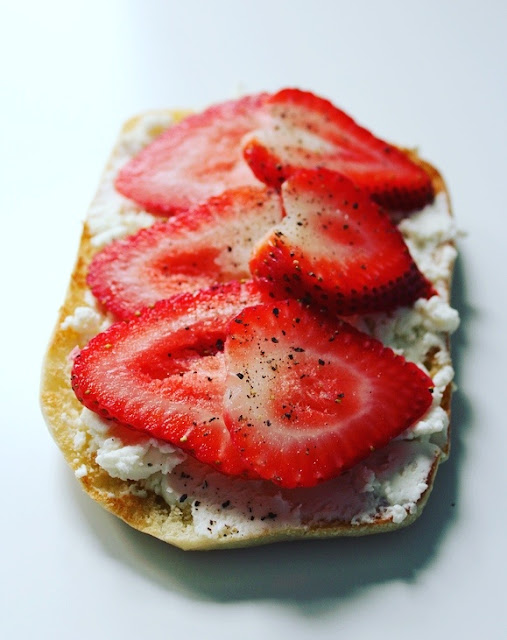
Goat Cheese with Sweet Strawberries and Black Pepper


Thickly spread the goat cheese over the toast then top with ripe, sliced strawberries. Season with freshly ground black pepper for a savory/spicy/sweet sophisticated snack.


Dill Cream Cheese and Cucumber


Like the traditional English tea sandwich, these fresh flavours are amazing atop crunchy toast. Chop fresh dill and mix into cream cheese, spread across the toast then top with thinly sliced cucumber and more fresh dill.


Mozzarella, Tomato and Pesto


An upside down caprese salad on its own giant crouton! Cut the fresh mozzarella into thick slices and fan over the toast, pile chopped tomatoes on top and drizzle over pesto, finish with thinly sliced fresh basil.

Which one will you try first?


entree

Meatless Monday: Baked Eggplant with Spinach and Ricotta

April 25, 2016


After graduating to my 24th week of pregnancy I needed to whip up something to make good use of my 23 week eggplants!


In honor of #meatlessMonday, and much to the initial chagrin of Mr meat-lover-Vine, this baked eggplant recipe is perfect for vegetarians and carnivores alike, with the eggplants lending a robust and 'meaty' texture.


Teamed with the classic combos of ricotta & spinach, and a sweet, rich tomato & basil sauce, this recipes lends itself to being made in large quantities and enjoyed straight out the oven, then portioned up and frozen for easy weeknight meals.


Makes 8 portions
Ingredients:

olive oil
3 cloves garlic
28oz/800g canned tomatoes
splash of balsamic vinegar
1 teaspoon of white sugar
small bunch of basil

2 eggplants/aubergine

2 cloves garlic
nutmeg
1lb/450g fresh spinach
3 tablespoons grated parmesan
1lb/450g whole milk ricotta
pepper

8oz/230g fresh mozzarella 

Method:

Preheat oven to 385F.

Eggplants have a lot of water in them, to get them baked without becoming mushy, and to enhance their flavour it's best to salt them before cooking with them.

Cut the eggplant into thin, lengthwise slices and lay out on a baking rack over the sink or over another large baking tray. Generously sprinkle salt over all the slices, this might seems crazy but the salt will be washed off before you put them in the dish

Whilst the eggplants leach water, make the tomato sauce and ricotta mix. To make the sauce, finely mince the garlic (3 cloves) and add to a pan with a little oil, fry on a gentle heat until the garlic softens but does not colour. Pour in the tomatoes, balsamic vinegar and sugar, then simmer for fifteen minutes. Turn out the heat under the sauce an add in finely chopped basil, salt and pepper to taste.

To make the ricotta mix, finely mince the garlic (2 cloves) and sauté in a little oil in a large, high sided frying pan. When the garlic is softened but not coloured, add in a handful of spinach, sauté until the spinach has wilted. Continue to pile in the spinach and cook it until it wilts until you've cooked all the leaves. I prefer sautéing spinach as it allows a lot of the excess liquid to fry off in the cooking process, unlike steaming. 

Remove the spinach from the pan and lay out on a few layers of paper towel, press the spinach with more paper towel to removed as much liquid as you can, then allow the spinach to cool.


Once cooled, chop the spinach and add it to the ricotta, along with the parmesan. Add about half a teaspoon of freshly grated nutmeg and pepper to taste. I tend not to add additional salt as the parmesan is very salty.
To build the dish, first wash the salt off the eggplant. It may seem counter productive to put water back on to the slices when you've been trying to draw moisture out of them, but the water will not be on the eggplant long enough to be reabsorbed. Rinse each slice off all the salt, lay onto a couple of folded layers of paper towel, press the slice with more towel to be sure it's as dry as can be.

Layer a large ovenproof dish with ricotta, slices of aubergine and tomato sauce, repeating until you've used everything, finishing with a tomato sauce layer.

Tear the fresh mozzarella into small pieces and dot over the top of the sauce. Bake in the over for about an hour, test whether the eggplant is cooked by inserting a knife into a couple of spots to check how tender they are. If they are still quite firm, continue cooking but place some foil over the top of the dish to stop the mozzarella burning.


style

Don't step on my gold sprayed shoes (uh huh huh)

April 21, 2016


One of my new best mates is my chiropractor. Seriously, I've started seeing him on the regs recently as a belly full of babies and an already slightly wonky spine don't appear to mix.

While recent years haven't seen me living and dying in high heels, there are occasions when throwing on a killer pair of shoes are just what a fancy outfit calls for. Unfortunately my new and ever changing center of gravity, and my pretzel backbone, make even a special occasion pair of heels a no go.

My fabulous friend Brittanny Taylor, Fashion and Lifestyle Photographer, Blogger and Small Business Consultant (check out her blog for examples of her beautiful work- she took our amazing baby announcement pics!), celebrated her birthday last week with the incredibly fashionable theme of 'Black & Gold'.

Knowing I'd be in the presence of some incredibly stylish people, pregnancy was not going to be a legit excuse for rocking up in ugg boots.


I've lusted after gold sneakers in the past but a severely raised eyebrow from Charlie as I pranced around the shop in my sparkly kicks put me off the actual purchase of them lest he made me walk a few paces behind him on outings together.

But now comfort is key, I've got carte blanche on weird and wonderful fashion choices (or at least the eyebrow has been tamed for a nine month period).

Being impatient and not immediately finding the exact shoes I wanted at my normal shopping destinations I though it'd be a great opportunity for a little DIY.

What you'll need:

White canvas sneakers- Mine were from Target
Masking tape
White/mineral spirits
Cloth or rag


I purchased a pair of simple white canvas sneakers from Target (I found some similar ones online at Matalan for those in the UK!) .

Using a wide masking tape, I covered all the parts of the shoes I didn't want to spray. My shoes had rubber toe caps as well as a rubber trim around the sides of the shoe from the sole up. Although pretty durable, the spray paint would chip off the rubber quite quickly and I though a white and gold contrast would look pretty awesome.

I also masked around the inner, upper edge of the shoes so that I wouldn't end up with gold feet or socks as the paint rubbed against me when I wore them.

It's really worth spending time getting the masking tape right as a clean, neat finish will make the shoes look less like a dodgy DIY and more like the super awesome gold shoes of your dreams (or my dreams).


To protect the inside of the shoes and save you having to fiddle with taping up the awkward space, scrunch up a carrier bag and stuff it in the shoes. Pull it so that between the masking tape on the inner edge and the bag, the inside is completely covered.

Place the shoes on a surface you don't mind getting sprayed, and be sure to do the painting in a well ventilated area, preferably one you can leave the shoes out to dry in rather than having to move them and possibly smudging them.

Now get to spraying! Use even, thin coats across the whole shoe until you get the desired depth of colour. You don't want to spray it on too thick or you'll end up with drips and blobs that will crack when they dry.

Let the shoes dry for the amount of time your spray can suggests... and then let it dry a bit longer.  I'm so impatient when it comes to things like this, but I'm also learning my disappointment at cocked up DIYs because of my own impatience is pretty mammoth.


When the shoes are dry (ACTUALLY dry) peel off all the masking tape. Use a rag or cloth dipped in white/mineral spirits to clean off any sticky residue from the tape. My tape left behind a right old mess but the spirits made short work of it and left me with amazingly clean white lines against the gold canvas.

Now go out into the wider world and life you best, gold shoed existence!

If you try this DIY, show me! Tag me on instagram (@hollylikestocook), twitter (@hollylikes2cook) or on facebook (/hollylikestocook).


I only mention the products and shops I bought my items from so you can recreate the DIY as I did. This post is not sponsored by any of the mentioned brands, and I do not earn anything from links I've posted.


decorate

Holly likes to decorate: To the moon and back nursery

April 17, 2016


It's well known that I like to cook, but there's a whole bunch of other stuff I like to do as well!

We've been renovating our little, old house for the past year (or so) and are very nearly done, with one addition to the to do list dragging things on a little longer... a nursery!

Knowing that we are expecting two little boys, we wanted a fun nursery that could grow with them, something colorful but versatile should they grow to have distinct colour or theme likes and dislikes (i'm talking: 'mummy, i'm scared of outer space' and 'daddy, I really like dinosaurs', rather than 'mummy, I'm feeling like we should try something a little more feng shui' and 'daddy, pantone have announced 2019's colours of the year... get on it').

I knew I wanted something a little bit different when it came to colours, and it was actually a trip to see my brother that put us onto the idea of a blackboard wall, as we were thinking about ways to decorate his new place. As it happens, we have had a full height and width blackboard wall in one of our homes before. Back in our house in the UK, one of our kitchen walls is a huge chalkboard, that saw many a penis and breast sketch at house parties. Funny, that actually having little kids rather than big kids in the house didn't turn us on to a chalkboard sooner!

I feel like if you commit to a big, permanent design choice like a bold wall, it's safest to keep it simple when adding in the rest of your 'theme' accents. As such the 'space' theme in our nursery will come from bold colours, simple stars and artwork, that can be swapped out or added to as the boys grow.


1. Rustoleum Tintable Chalkboard Paint in Moonstone from Home Depot
2. Behr Paint & Primer in One in White from Home Depot
3. Spritz Coloured Chalk from Target
4. Rug from Target
5. Fabric Storage Cubes in Blue, Red and Yellow from Target
6. Personalised Wooden Rattle Rocket Ship Toy by Bannor Toys on Etsy
7. Mix and Match Felt Stars by Crafty Wool Felt on Etsy
8. Hemnes Dresser in Grey Brown from Ikea
9. Red Venetian Blinds (I'll be spray painting an existing pair we have)
10. Circo Woven Fitted Crib Sheet in Floating on Air from Target
11. Aden and Anais Swaddle Wrap in White Sky Blue Grey from Target
12. Child of Mine by Carter's Fitted Crib Sheet in Stars from Walmart
13. Just one You by Carter's Baby Boys 4 Pack Body Suits in Green from Target
14. Room Essentials Paper Star Lights in Sea Going from Target
15. Gulliver Crib in White from Ikea


baking

Banana, chocolate and hazelnut tray bake bars

April 15, 2016


Though it may seem like I'm always experimenting with different recipes and ingredients, the truth is that everything that comes out of my kitchen is made from things from my regular grocery shop, that make up my weekly meal roster, and are only eaten by me and Charlie... occasionally a guest or two!

I would love to be experimenting with weird, wonderful, varied ingredients every single day but it's just not in the blogger budget for now- which is why I really hate it when things go to waste.

One (or sometimes two!) thing that's been added to my weekly shopping list are my gestational fruits and vegetables:


Being 'all about the food' I thought it'd be nice to visually record the growth of the twins, every passing Thursday, using the (sometimes crazy!) fruit and veg comparisons on so many baby websites and app! 

Using up a couple of extra onions or tomatoes isn't too much of an ask, even lemons find home in Mr Vine's martinis and avocados add some much needed good fat to my diet post first trimester weight loss.

But then there was banana week. I've never liked bananas. I'd like to like bananas but it's just never happened. I can just about deal with a very firm, bright yellow specimen but only if it's small. And I don't have to eat it all.

Sat in the fruit bowl getting blacker and blacker, I knew I needed to do something about them before they reached the point of no return. Adding bananas to cake mixes does make for a lovely, rich, moist bake, and adding a shit ton of coco powder hides the flavour of banana

Any Nutella fan can tell you that chocolate and hazelnut are best mates so a decadent threesome is born: Banana, chocolate and hazelnut.

Ingredients: Makes 8 bars in a 9x9in square pan

6oz/170g mashed banana (black skinned and slightly sad looking fruits make for great baking ingredients)
2oz/60g margarine or baking butter
4 oz/115g white sugar
4oz/115g light brown sugar
4oz/115g ground hazelnuts
3oz/85 all purpose flour (or self raising flour for Brits- just omit the baking powder)
2 tablespoons baking powder
1oz/30g cocoa powder
2 eggs
4oz/115g chopped hazelnuts (most for the batter, retain a sprinkle to garnish)
a few tablespoons of grated chocolate to garnish


Method:

Preheat the oven to 360F/180C.

Peel and mash the bananas in a large mixing bowl, add the butter and blend with an electric whisk.

Measure in the sugars and combine.

Weigh the flour, ground hazelnuts and cocoa together, and add the baking powder to the scale bowl. Mix the dry ingredients together before sifting half into the main mixing bowl.

Crack in a egg and mix everything together well, sift in the rest of the flour mix and crack in the remaining egg, combine.

Stir in the chopped hazelnuts.

Grease and flour the pan well so that the finished tray bake bars don't stick, pour in the batter and smooth out the top. Pop in the oven for 35-40 minutes, the cake will be done when the middle bounces back to the touch and a skewer inserted into the center comes out clean.

Leave to cool completely before sprinkling on the remaining hazelnuts and grated chocolate.


style

Tattoos, baby names, and pretty pretties from Metal Ribbon Studio + GIVEAWAY

April 12, 2016


I had the absolute pleasure of meeting with Corkie Bolton; jewelry designer extraordinaire, mumma to one of the most gorgeous baby girls I've ever met, and all around top person, this week over a coffee and a natter.

New York native, via Cambridge, and now living in Providence, Corkie runs Metal Ribbon Studio, making beautiful, edgy pieces using solid silver, gold and precious stones.

Chatting over coffee, and the adorably insistent babbles of her 9 month old baby girl (#girlboss in the making), Corkie tells me that a nickel allergy discovered in her teenage years led to her discovery, and love affair of quality jewelry:

"I like nice things that last, I want people to cherish these pieces for ever"


Rather than the costume caveat that is so usually associated with on trend, readily personalized pieces, Corkie is keen to combine raw and authentic style with high quality materials and longevity. 

Don't get me wrong, I love a piece of costume sparkle, but it turns out that having the real thing doesn't have to break the bank. Ready to wear pieces such as the silver ring Corkie wore to our coffee catch up, dotted with rubies cast right into the silver and sparkling from the natural facets of the metal, is a reasonable $140! Um Charlie, ruby is the birthstone for July, which is when we're likely to meet our babies... hint, hint!

Passionate about her commitment to creating quality pieces, the inception of Metal Ribbon Studio came after years of designing alongside a 'day job' in personal training (I've already added Corkie's jogger chic/yummy mummy motif to my mental Pinterest board), in the form of a quite literal fairy grandmother. Just before leaving Cambridge, a friend gifted Corkie the jewelry making tools of her late grandmother, wanting her legacy to continue under the herald ship of someone who shared the same passion and intent. Armed with this nudge from the universe and the excitement that comes with fate handing you a 'it's time to get shit done' pass, the rest is history. 


I am totally in love with the personalised namesakes of Metal Ribbon Studio, hand stamped tags and ribbons with letters and numbers of significance.

Inspired by the commemorative, expressive nature of traditional 'Sailor Jerry' style tattoos, Corkie stamps the letters and numbers that mean the most to you onto delicate, and yet bold, ribbons of shining silver.

Knowing that I'm welcoming two baby boys this summer, I'm excited to be the honorary girl in a house full of chaps! The idea of being 'their' girl, and them being 'my boys' has such special meaning to me, I'd been thinking of how to capture this feeling for some time.


I have a few little tattoos, simple designs that are intended to pin point moments in my life of importance to me, whilst the idea of adding to my collection (sorry dad) lingered for a while it just wasn't the right one. Turns out I was on the right track, but instead of a tattoo in ink on my skin, it's a tattoo in silver that won't fade, that will capture this feeling for me.

It took Charlie and I a long time to find the names for our sons. It may seem premature to some to have already named our children, but having faltered so many times to get to this point, naming our boys makes us feel like they really are coming this time. E & J tags will hang alongside their dad's initial, C, always close to my heart, my boys together.

To celebrate Metal Ribbon Studio being stocked at local gem (pun intended) Talulah Cooper on Traverse St, and to coincide with Wickenden Street's Maker's and Merchant's Sidewalk Sale Corkie will not only be hosting a Trunk Show at Talulah Cooper, she's offered a personalised silver necklace to one very lucky person!

Mini Ribbon Necklace

To be in with a chance of winning your very own, personalised Metal Ribbon Studio necklace, head over to my instagram to enter.

You can find Corkie's pieces in Talulah Cooper off Wickenden, as well as on her website, www.metalribbonstudio.com


Corkie was very generous to gift to me the necklace you see in the image above, whilst this is sponsored post I write honestly about the things I love, and the things I don't love quite so much!


Rules for Metal Ribbon Studio giveaway.

1. You must follow me, @hollylikestocook, on instagram
2. You must follow @metalribbonstudio on instagram
3. Tell me how you would personalise your necklace and why
4. Tag two friends you think may want to win

The competition will be open until April 30th at 4pm, a winner will be chosen at random from all eligible entries and notified via the instagram post by May 2nd at noon EST.

The winner will have 24 hours to make contact with me to claim their prize, they will then be put in touch with Corkie to tell her how you would like your necklace personalised.

The prize consists of one (1), single tag, silver necklace with a personalised stamp of your choice. Postage to the US will be included in the prize, the competition is only open to US residents.

This post is in no way sponsored, endorsed or affiliated with Instagram, inc. By entering entrants confirm they are 13+ years of age, release Instagram of all responsibility, and agree to Instagram's terms.

drinks

I miss booze: pregnancy friendly cocktails

April 08, 2016


I really didn't think I'd be that bothered about cutting out alcohol during pregnancy. Whilst I certainly enjoyed a drink of an evening, for me it's always been much more of a social activity, I'd rarely get home, pop open a bottle and pour a glass or three in front of the telly.

I'm no square when it comes to the fun water but I really, really didn't think I'd be that fussed. Turns out I was wrong, or lying to myself.


So to allow myself a glass of something pretty and more interesting than soda water, I've whipped up a couple of alcohol free libations that'll not only trick your tastebuds into believing it may one day be spring, it'll keep your OBGYN off your case:


Virgin (ha!) Daiquiri

3 ripe strawberries
5-6 leaves of basil
1 tablespoon simple syrup
soda water

Muddle the strawberries, basil and simple syrup in a cocktail shaker, add 3 cubes of ice and a splash of soda water so there it enough liquid to get everything shaken together.

Strain the strawberry puree into a martini glass and top with soda water, garnish with a sprig of basil and a strawberry.


Mumma's Margarita:

zest of a lime
tablespoon of salt
tablespoon sugar
juice of one lime
juice of 1/4 of an orange
limeade (choose a good quality one rather than a sugar fake one- it's still cheaper than wine!)

Mix the lime zest, salt and sugar and a shallow dish, wet the rim of your glass with a wedge of lime then dab into the lime sugar salt until the rim is well coated.

Stir together the lime, and orange juice with the limeade over ice in a stirring glass to cool, then pour into the rimmed glass.


NYC BABY (friendly)! :

(My FAVOURITE)

1 teaspoon of maraschino cherry syrup
3 drops of Peychaud's bitters (whilst bitters ARE alcoholic they are so, so diluted in this recipe the alcohol content is practically non existant, although the flavour remains)
1 teaspoon maple syrup
soda water
two maraschino cherries
a generous curl of orange peel

Place three cubes (or one large cube) of ice in a low ball glass, add the syrups, bitters and enough soda to fill the glass. Stir well then garnish with cherries and orange peel.


Baby Bellinish:

2 tablespoons of mashed RIPE papaya- papaya is full of beta carotene which is great for growing babies, however studies have show that unripe papaya isn't good for the preggers set, so make sure it's really soft and ripe.
1 tablespoon simple syrup
juice of a lemon
juice of a lime
generous sprig of mint
soda water


Add the papaya puree, lime and lemon juices, simple syrup and mint to a cocktail shaker along with 2-3 cubes of ice and enough soda water to allow everything to be shaken.

Pour into a champagne glass and top with soda water, garnish with fresh mint, a slice of lime and twirl of lemon peel.


These can, of course, be enjoyed by those not up the duff, but for those who are still on a 0% proof liquid diet, they are a nice little gloom chaser!... (especially when your husband is enjoying his bourbon bloody mary at brunch)

Which is your favourite? What was your go to pregnancy libation?

entree

The Rhode Show- A twist on a classic comfort food dish: Roasted pepper & tomato soup with baked ‘grilled’ cheese croutons

April 06, 2016


It's not spring. Someone messed up the dates somewhere, because this is definitely not spring time weather. I earned a telling off from both my mum and my husband for attempting to shovel snow whilst 22 weeks pregnant (turns out being a grown up is having two generations entitled to tell you off), and definitely needed warming up afterwards.


There's nothing quite as comfortingly classic as tomato soup and grilled cheese (or a cheese toasty if you're joining us from the other side of the Atlantic- hello!). Whilst there's a lot to be said about keeping it simple, something adding a bit of flair doesn't have to mean a heck of a a lot more work. 

I've jazzed up a classic with the addition of some sweet peppers, and turn up the decadence level on this cheese toasty with some goat cheese and butter baked, crispy crust!


Serves 4

For the soup:

2lb tomatoes
3 cloves garlic
2 red bell peppers
1 large 28oz can of crushed tomatoes
2 tablespoons of balsamic vinegar
Splash of olive oil
Salt and pepper
Fresh basil

For the croutons:

8 slices white panini bread (slices that are larger than a standard sandwich loaf)
4oz cream cheese
2oz shredded mozzarella
2oz shredded Cheddar
2oz soft goat cheese
2 tablespoons butter

Preheat the oven to 360F.


Cut the tomatoes into quarters, deseed the peppers and cut into chunks of a similar size to the tomatoes.

Peel the garlic cloves and squash with the flat of a knife blade so that they crack- this will mean that when they roast they will become sweet and rich.

Tumble the vegetables in a large baking pan with the olive oil, balsamic vinegar, salt and pepper, so that everything is well coated.

Pop in the oven to roast for a total of 45 minutes, check and turn the vegetables over in the cooking oil at about 20 minutes.

Whilst the vegetables roast, mash together the cream cheese, mozzarella, cheddar and goat cheese in a bowl.

Spread evenly over four slices of bread, then top with the remaining slices. Lay out the sandwiches on a baking tray and brush the top slices with melted butter.


You want everything to finish cooking at around the same time, so don’t put the sandwiches into the oven until there’s only 15 minutes left for the vegetables to roast- this will give you time to finish the soup, and have it ready to be topped for your hot baked croutons! You can, of course, make these things separately.

Bake on the sandwiches, at the same heat as the vegetables for 20 minutes, then flip, brush with butter and bake for another 5 minutes until the bread is crisp and golden.


To finish the soup, scoop the roasted vegetables into a large stockpot and add the crushed tomatoes. Heat through until the soup bubbles; remove from the heat and blend until smooth. BE CAREFUL! Fresh cooked tomato soup is hotter than the surface of the sun.

Return to the heat to bring back up to temperature, add in a small handful of fresh chopped basil then serve.

Top the soup with your baked ‘grilled’ cheese, cut into generous croutons, and a sprinkle of fresh basil.


Want a play by play demonstration of how to make this recipe? You're in luck! I cooked this on The Rhode Show this morning so you can watch and cook along to the YouTube video below

drinks

The lazy girl's cafe au lait

April 05, 2016


I love a steaming hot, milky coffee.

I don't have a coffee maker, I've got a french press and we once laid claim to an unwanted machine that takes individual brew pod (was not a fan, too up so much space and made SO much rubbish from all those little pots). I'd would like one but honestly, if our recent car debacle has taught me anything, I'd need to spend some serious money to get something that's going to give the results I want not going to crap out on me entirely ruining my Saturday.

That epiphany realised, it's also pretty clear that spending $500 on a cappuccino maker when expecting your first two children is not the wisest fiscal decision. So lazy girl cafe au laits are here to stay!

There's nothing ground breaking going on here, the only way I deviate from the norm is I like to let my ground brew fully immersed in boiled water for a minute before pouring them through a filter. I find that the pour over method doesn't quite give me the strong flavour I like in an espresso based drink. It doesn't take any longer as I let my grounds steep for as long as my milk is in the microwave, about two minutes.

So this is my go to, at home coffee, what's your favourite way to make coffee?