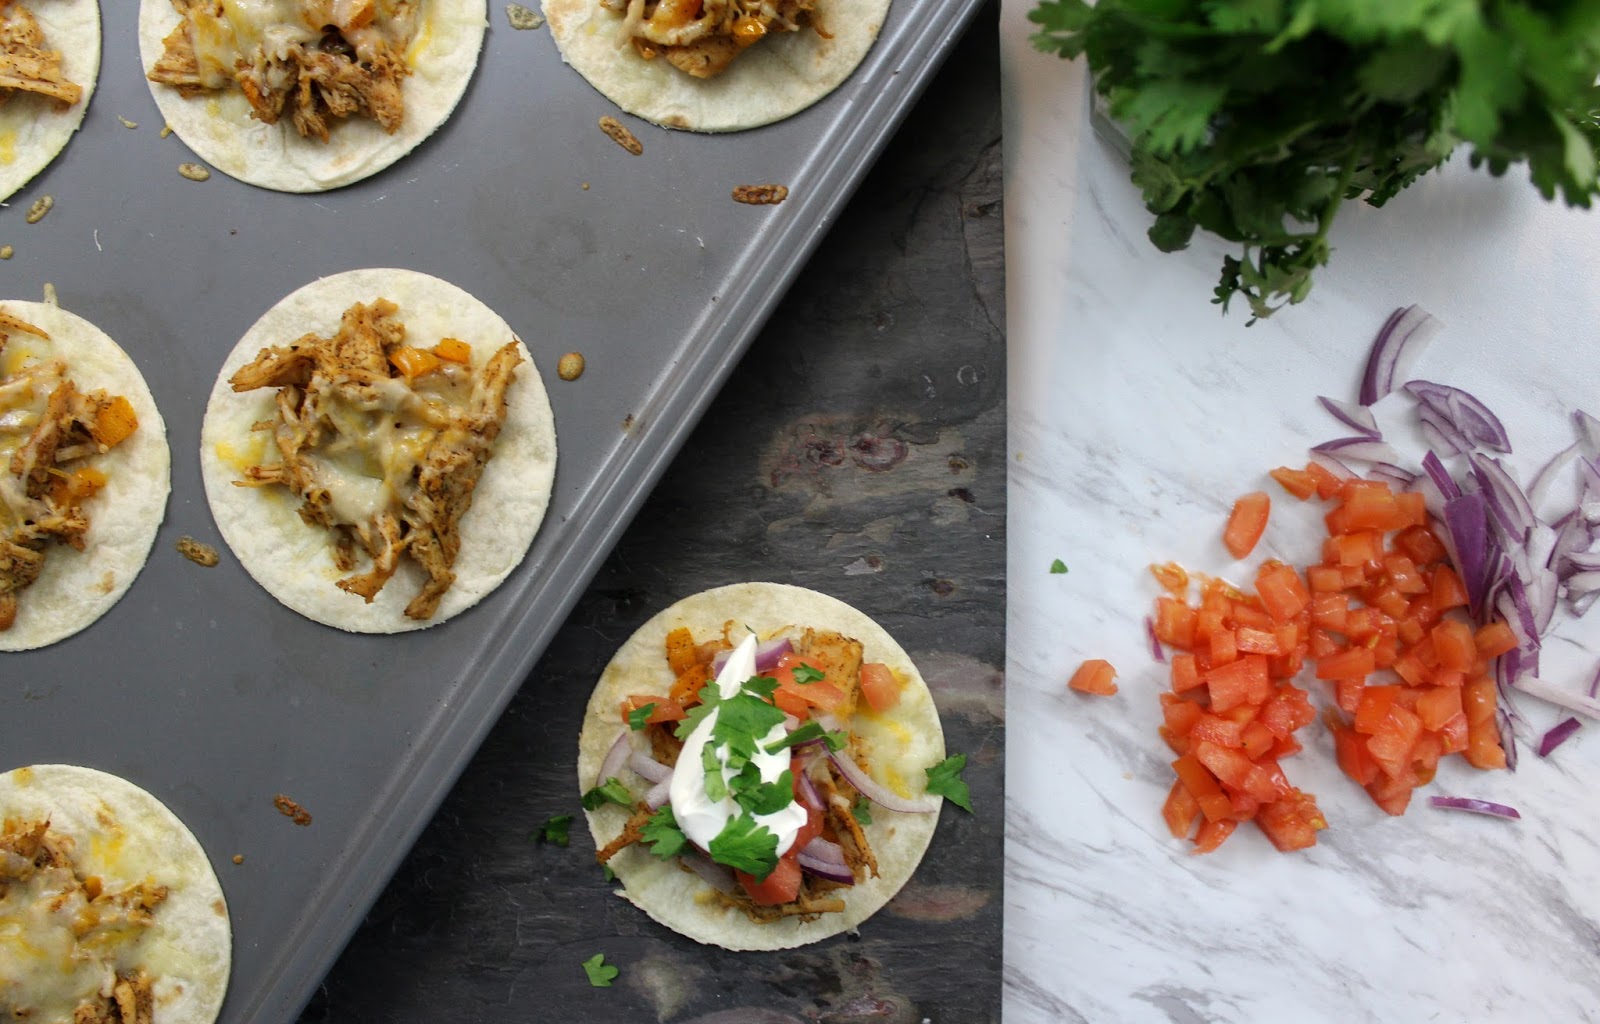
eat

Thanksgiving Green beans: Traditional Casserole vs. Lighter (no less delicious!) Salad

November 21, 2016


Thanksgiving, the food lover's highlight on the seasonal calendar. I've written before about how Thanksgiving is a new holiday to Charlie and I, as the British calendar does not include it. It is, however our fourth festive season in the States and, we are very lucky to be able to say, our fourth season of Friendsgiving dinners!

That over-full and completely stuff feeling post dinner is about as traditional as the turkey itself! This year, if you're looking for a lighter version of the classic green bean casserole try my recipe for a lighter (but no less delicious!) salad version, complete with creamy (but not naughty) garlic dressing.


Ingredients:

1 lb green beans
1 lb mushrooms, sliced
1oz butter
3 cloves garlic, minced
2 tablespoons sherry (optional- but highly recommended!)
2 cups heavy cream
1 teaspoon flour
1 cup cornbread
splash olive oil
salt and pepper


Steam or boil the green beans, whichever is your preference. If you have purchased packaged green beans its super simple to stab a few holes in the bag and throw in the microwave to steam for 4-5 minutes until tender. What ever method of cooking you use, cook the beans until tender but not soft, and allow to drain completely.


In a large pan, like a dutch oven or stock pot, melt the butter then gently fry the garlic for a few minutes on a medium heat.


Add the mushrooms to the pan and fry. Conventional cooking wisdom would warn you against overcrowding the pan with mushrooms, I would completely agree in circumstance when you desire a crispy mushroom, however overcrowding isn't a concern in this recipe.

The mushrooms will release a lot of liquid as they cook, which would make for soggy mushrooms if you we're intended to cook them quickly. Keep on cooking the mushrooms for 25 -30 minutes on a medium heat, until they have reabsorbed all the liquid- this will make them dense and rich with flavour.


If you are using sherry- turn up the heat under the pan to high, when the mushrooms are sizzling fiercely, splash in the sherry and cook until it has reduced to almost nothing. Turn the heat back to medium. 

Add the cream and stir in well, cook everything together for 10 minutes- use a teaspoon of flour to thicken the sauce if neccessary, the consistency should thickly coat the back of a wood spoon.

Turn out the heat then add the beans to the sauce and stir to coat, pour everything into a large baking dish and spread the crumbled cornbread over the top. 

Bake in the oven at 360F for 35- 40 minutes, until the cornbread is golden and crunchy, and the sauce bubbles up around the edges of the beans.


* this is a pre oven final photo, I made this to bring to a Friendsgiving and we ended up having so much fun we ate everything before I took a final cooked photo! Imagine this, just browner!


Ingredients:

1lb green beans
1 tablespoon fennel seed
splash of olive oil
salt and pepper
5oz arugula
4oz pecan nuts
4oz dried cranberries
about 8oz cornbread

For the dressing:

10 tablespoons olive oil
3 tablespoons apple cider vinegar
2 tablespoons 0% fat greek yoghurt
1 heaped tablespoon roasted garlic
salt and pepper


Cut the cornbread into cubes about an inch square. Spread out on a baking dish, drizzle with oil and season with salt and pepper.

Lay the beans out evenly on a baking dish, use more than one dish so that the beans aren't layered too thick. Sprinkle over the fennel seeds, salt, pepper, and drizzle over the olive oil. Toss the beans in the seasonings and oil, then roast the bean and cornbread croutons at 375F for 30-40 minutes, the beans should be tender with a little colour and char on the edges, the cornbread croutons should be deep gold in colour and crunchy.


Allow the beans to cool completely- you can roast the chill the beans up to two or three days before assembling and serving the final salad.


In a food processor (or in a bowl paired with an immersion blender), mix the dressing ingredients until smooth.

The yoghurt makes for a really creamy, comforting dressing whilst keeping the dressing relatively low in fat!


Build the salad on a large platter, start with a base of arugula leaves, drape the beans across the platter, then generously sprinkle over the cranberries and pecans. 


Finish with the croutons on top, rather than dress the salad, I offer the dressing on the side for guests to add themselves- this was they can choose how indulgent they want to be: few croutons and a little dressing for a truly virtuous plate; piled high with crunchy cornbread bits and heaps of creamy dressing for a little more comfort!


Which green bean dish do you think you'll be making this Thanksgiving?


eat

Oven Roasted Garlic

November 17, 2016


Tis the season to be roasting. Autumn to me means slow cooking, roasting and batch cooking comfort food. Garlic features heavily in my home cooking, whether it is the star of the show or a base to built on. 

I've previously extolled the virtues of prepping garlic for easy use in cooking, well this is the fall version!


I usually roast about 15 whole bulbs at a time- the post-roast peeling part is a bit tedious so I'd rather do a huge batch and put that off as long as I can.

Cut the tops off the bulbs to expose the cloves, drizzle them with oil and season with salt and pepper.


Roast at 350F for about two hours, check that the garlic is golden rather than dark brown, if it's colouring too quickly turn your oven heat down- the aim of the game is low and slow.

Once roasted, allow the garlic to cool completely before removing the cloves from the skin. This part is fiddly and tedious but worth it in the end, I'd recommend the peel rather than the smush method, but you do you.


You can keep your cloves whole or blend them into a smooth paste for use as bases, in sauces, to coat meat, in mashed potatoes or spread on toast (YES).

To store, pop them in a jar and cover with a thin layer of oil. The garlic will keep in the fridge for 2 to 3 weeks... but it probably won't be there that long!


style

Eos Lip Balm: The busy mum's secret weapon

November 08, 2016


Gone are the days of me spend a chunk of time in front of the mirror putting my face on each morning. I was never a heavy make up kind of gal, without wanting to sound too much like Gone Girl's Amazing Amy; I was never that high maintenance in the beauty department.


Don't get me wrong, I loved a dramatic smokey eye or a slick of red lippy for a night out, but day to day I kept things pretty low key: cover up for my tricky skin and a slick of mascara for my pale-are-they-even-there lashes, and I was out the door.

Now, even that is a once is a while occurrence! With my hair having undergone the chop (courtesy of Lulu Locks of Suite Tart- more on that to come soon!), and my daily ablutions consisting of a 37 second shower (or handful of baby wipes on a bad day) my beauty products need to work really hard to keep me happy.. or even slightly interested.


A drug store register staple, Eos lip balms (available at Target) are as hard working as they are adorable. You could be forgiven for thinking that in their impulse/easy to grab packaging (and at less than $5 a pop) they might be a bit naff... but that's just not the case.


Aside from smelling delicious (especially the minty flavour), they are cute as a button and actually perform really well- the chances of me reapplying anything on the regs is slim to none, so that's key 
for me!


I have one of these little baubles in my diaper bag, in my actual grown up hand bag, and rolling about in my glove box- hopefully increasing the chances of me looking at least a little bit put together at some point. 

I've already stashed a selection of these away for stocking stuffers, including these three pretties: Vanilla Bean (cream), Coconut Milk (pink swirl), my fav Sweet Mint (green), and if you're still mourning the end of summer- Summer Fruit (not pictured but available here)!


What's your go to beauty must for busy mums? 

Thank you so much to Eos for offering me the chance to snag some free lippies to sooth my neglected lips, whilst I did not have to pay for the product I only work with brands and products I genuinely enjoy. 


eat

New England Apple Sauce: Pure and simple

November 07, 2016


Apple picking is a bit like heading to the beach on a summer day, or going out to cut down your Christmas tree from the farm; it's a seasonal tradition.

Autumn, or Fall, has always been my favourite season. Even with our milder incarnations of the seasons back in the UK; the turning of leaves from green to red, and the golden evening sunlight always won over a spring or summer day in my book.

When we moved to New England my love affair with Autumn took on a whole new level. Apple picking, hayrides, maize mazes, apple cider, cinnamon EVERYWHERE... this is what my heaven looks (and smells) like.


As is also tradition, we ended our trip out to Jaswell's Farm (my favourite of the RI apple picking options) laden with more apples that we knew what to do with.

At only fourth months old, and preemies at that, my boys won't be starting to eat solid food for a little while yet. But when they do, and I know I have to keep my expectations in check, I'd really like for them to have as much home made food as possible.

Apple sauce, as I've learned from my few years here, is one of the staples in the baby weaning arsenal. So when my boys are ready to move on from just milk, there will be some pure and simple New England apple sauce waiting for them in my freezer.


Unlike grown up apple sauce that you might find smothered over roasted pork, or sandwiched in-between crisp pastry with a side of ice cream, baby apple sauce is as simple as it gets.

First time foodies don't need added spices or sugars, so keep it simple when whipping up your first few batches.

Peel, core and chop the apples into chunks about an inch cubed. You should also be really vigilant for stray pips, bits of skin, stalk or core in this batch- whilst is doesn't matter so much for the big kids, the little ones should be getting a really fine, chunk free puree to start them off with.


Pile your apple in to a pan and splosh in enough water to come halfway up the fruit. Bring the pan and its contents to the boil, then turn down the heat and simmer until the fruit is very, very soft.

Mash with a fork, or for a very fine puree use a blender. Your knowledge of your child's comfort level and skill with texture should lead you in deciding just how much to mash!


It's always best to store the apple sauce in sterilised jars, even if you're going to use the puree right away. I like to use glass as it's easy to sterilise and is infinitely reusable, plus the Weck (I picked up mine from Stock in Providence) jars are super cute. Sterilise your jars by immersing them in boiling water, or running them through the dishwasher- be sure not to touch the inside of the jars before filling them.

Fill the jars with the sauce, leaving a little room for expansion if you are planning on freezing them. Frozen puree can safely hang out, fully frozen in the freezer for 6 months- many outlets say it'll actually be fine for up to a year but with littles you want to make sure anything you give them is of the highest quality, and this stuff is so good it'll be devoured long before that anyway!