baking

Truffle Cake Pops

October 31, 2014

Truffle Cake Pops

Truffle Cake Pops

Truffle Cake Pops

These are not the cakes pops that have become popular recently, these are the pops that I have been making for yonks, ever since I found myself with cake off cuts and leftover butter cream.

You can now buy 'cake pop baking tins', which makes me wonder why not just bake cupcakes? Sure it's a different shape but it's basically just a cupcake on a stick. Truffle cake pop's satisfy two  requirements: 1) They are a thrifty way to use up leftovers 2) They are an entirely different treat to a cupcake.

You may find yourself with cake off cuts if you are making an odd shaped cake, like my doll house cake, and I usually find I may way too much icing, i'm not sure if this is due to a lack of understanding of volume or my sub conscious desire to always have cake pops in the fridge?

Crumble up your left over cake and add it into the buttercream, I have no specific measurements for you as this is always a left over recipes, but you want to be sure that the cake crumbs are quite fine and that there is enough butter cream to coat all the crumbs well.

When it's all mixed into a sticky mess, pop it into the fridge for the butter to firm up and make forming the pops easier.

After a couple of hours, scoop out a heaped table spoon of the mix and roll between your palms to form into a ball. The butter will melt if handled too much so try and keep the shaping time to a minimum.

The sticky surface of the buttercream is great for sticking coatings like sprinkles or edible glitter to. Other coatings you can try are edible spray paint or dipping in melted chocolate. This is really a recipe you make work for you based on your preferences and what you have in the pantry!

Slide a stick into the pop- I used robust paper straws ad I likes the pattern (or make smaller balls and serve as little truffles), and pop back into the fridge for the butter to harden.

These little lovelies are a total sugar over load so whilst thrifty and healthy for your pocket, they are certainly falling onto the naughty but exceptionally nice category!


events

PVD Hoot's Birthday

October 30, 2014

Happy first birthday PVD Hoot!

Making a cake for someones birthday is always fun, but when you know you're making a cake for about seventy people to celebrate the first anniversary of an incredible event- it's even better!

This week i've been up to my eyes in cupcakes and buttercream, making sure I have enough mini cakes to keep all the musicians and music lovers attending PVD Hoot's first birthday party happy.

Keeping it simple (which as we know is always a winner!) I stuck with the traditional birthday cake, vanilla sponge topped with sweet butter cream icing. These were of course coloured in the HLTC style and topped with some edible shimmer- don't just live the brand, eat it. And then stick some glitter on top!

Although many recipes will tell you otherwise, I always bake with salted butter. Some recipes will call for an addition of salt but I find that slated butter has just the right ratio of salt to sweet and has never ended up with cakes or bakes resembling a horse lick.

Using salted butter in the buttercream give the icing a sweet and tangy flavour- think of how salt is added to super sweet thinks like toffee, caramel or chocolate to bring out the flavour, it's exactly the same principle.

Have you got an event that you'd like some tiny sparkly cakes or something a little bigger baked for? Having a holiday party in desperate need of some fancy canapes? If so let me know!


entree

Healthy Vegetarian Roasted Carrot, Coriander and Orange Couscous

October 27, 2014

Healthy Vegetarian Roasted Carrot, Coriander and Orange Couscous

Healthy Vegetarian Roasted Carrot, Coriander and Orange Couscous

Healthy Vegetarian Roasted Carrot, Coriander and Orange Couscous

This seems like an appropriate recipes to be posting on a Monday- perfect for a meatless meal!

Root vegetables are deliciously in season right now. Normally steamed or boiled, root vegetables really come into their own when roasted. Much like roasting meat, the key to roasting vegetables it to keep it simples, with just a couple of flavour enhancers to bring out the natural sweetness.

The age old partner of the carrot is coriander, both in the ground spice and green herb variety (in
America the leafy part of the coriander is called cilantro). Orange is a really great fragrant addition, adding a bit of lightness to the earthy carrots.


Ingredients: Serves 2 as an entree or 4 as a side

1lb carrots
6 oz couscous
1 orange, juice and zest
a couple of glugs of olive oil
1 tsp ground coriander
small bunch cilantro/coriander leaf
Salt and pepper

Method:

Peel the carrots and slice into chunks diagonally. This isn't just to look fancy, by slicing diagonally you create lots of sharp edges that will roast up to be crispy and incredibly sweet.

Zest the orange and set the zest aside, you don't need it just yet but it's a lot easier to zest a whole orange rather than squeezed halves.

Tumble the carrots into a baking dish then squeeze over the orange juice, a couple of glugs of olive oil, the ground coriander and some shakes of salt and pepper.

Pop into a preheated oven at 375F and roast for about 15 to 20 minutes.

In the mean time, pour the dried couscous into a tupperware dish that has a lid- you can put it into any bowl that can be covered with cling film but as it's only going to need to be covered for about 10 minutes so using a lidded dish seems less wasteful.

Season the couscous with salt and pepper then pour in enough boiling water to just cover the grains, too much water and the couscous will become soggy. It's better to use less, make crunchy couscous and need to add a little more water to get it just right. Cover the dish or pop the tupperware lid on and leave to absorb the water for about 10 minutes. Use a fork to fluff up the couscous and check the consistency.

Finely chop the cilantro and add it with the orange zest to the couscous, stir in well.

When the carrots are roasted and still warm mix them into the herby, orangey couscous

Serve warm for a seasonal salad or let cool and keep in the fridge for a heathy, tasty lunchtime treat!


hints

Get Shucked: How to Shuck Oysters with Stock Culinary Goods

October 24, 2014

Get Shucked: How to Shuck Oysters with Stock Culinary Goods

Get Shucked: How to Shuck Oysters with Stock Culinary Goods

Get Shucked: How to Shuck Oysters with Stock Culinary Goods

I am a new, and still a little apprehensive, oyster eater.

Mostly I think I was put off by the texture (or the thought of the texture) and the 'all or nothing' fashion of slugging down the oyster in one fail swoop. That complete commitment to slurping down something I was, as yet, undecided if I was going to like meant my first oyster experience took some time to work up to.

My first oyster was actually a, thankfully, gentle introduction, in the more approachable form of a lightly fried tempura morsel with a light, sweet, Asian style mignonette. Throughly enjoying the light, fresh flavour of the meat itself it wasn't long before I started flinging back the raw variety. 

I'm still not a huge fan of giant oysters, though it was recently point out to me that you can bite an oyster on the way down- I'm not sure why I was sticking so vermently to the 'rule' of down-in-one when this simple and obvious step made oysters so much more accessible and far less scary to me!

Since moving to the ocean state, it's been an unusual occurrence to see a menu without oysters on it, even our favourite local The Ivy does fresh shucked oysters! But it wasn't until I popped home for a quick visit that I actually got my hands on some to try my hand at shucking... it was, suffice to say, an unmitigated disaster.

Hiding what remained of my mum's shattered kitchen knife in the bottom of the bin I resolved to figure out how to open and serve these beasts as beautifully and effortlessly as they did back in my adoptive home.

Fortunately for me Stock on Hope Street was quick to oblige with a shucking master class only a few days after I was back Stateside!

Led by owner Jan Faust Dane, whose shucking skills were perfectly compliments by some deliciously chilled white wine, we had a close up, hands on master class at how to get shucking:

  • Use the right tools: well duh, is what I would say if I hadn't destroyed a chef knife attempting to ram in into a shell a week earlier. Oyster knives have far thicker, stronger blades which allow you to add the (surprising) amount of power and pressure behind to sneak the blade into the shell and ease it open. The blade is short with a sturdy handle, limiting the opportunity for the end of knife to poke out too far on the other side of the shell into your hand or for your grip to fail and result in copious blood loss.
  • The towel method is a good place to start: Holding the oyster in your palm might look super fancy, but short of wearing a chain mail glove or risking your potential for even having an accurate palm reading again, the towel method will get you your oyster without a side of ER. Place a towel on the surface in front of you and your oyster on top with the hinge end facing toward your dominant hand- which ever hand you hold the knife in. Fold the towel over the top of the oyster so that the hinged end is still poking out but you can place the flat pal of your none knife holding hand on top of the towel covered shell. Imagine you've tucked the oyster in to bed and are giving him a reassuring tummy rub. Place the point of the knife into the join of the top and bottom shell slightly to the left of the beak (the pointy part of the hinged side of the shell). Work the tip of the knife into the join until you can push the knife into the shell, keep the blade flat, parallel to the table and as close to the top shell as you can. Work the blade in a sawing motion along the shell and out the other end of the oyster. Remove the top shell then slide the blade under the oyster meat, releasing it from the bottom shell, then flip it over  in the shell for presentation.
  • Serve with a mignonette or horseradish ketchup: The super fresh, light flavour of the oyster is compliments with a lovely sharp mignonette or a spicy, hot horseradish ketchup. Below is a video of Jan mixing up a delicious shallot, pink pepper and Olive Del Mondo champagne vinegar mignonette. You can also keep it super simple and light with a squeeze of fresh lemon.


A video posted by Holly Vine (@hollylikestocook) on

Aside from the brilliant demonstration, tons of fresh oysters and flowing wine, it was wonderful to be surrounded by the incredible selection of kitchen loveliness Stock has on offer. Rather than just a store, Stock represents a culinary community hub on Hope Street for home cooks and chefs alike.


Get Shucked: How to Shuck Oysters with Stock Culinary Goods


eating

Motif Magazine: Locale Profile- The Salted Slate, Wayland Square

October 22, 2014


I was asked by Motif Magazine to pop along to The Salted Slate for dinner recently, and having already had the great fortune to try their brunch menu, I was super excited. Super dooper if you will.

"The new kid on the Wayland Square block, The Salted Slate, opened its doors in July. Occupying the former Farmstead location on Wayland Avenue and with Chef Ben Lloyd at its helm (a 10-year veteran of the Providence culinary scene), The Salted Slate’s menu reads like a who’s who of fabulous local producers and a what’s what of homemade delights.I’ve been lucky enough to sample their brunch menu previously (FYI: it’s all about that chubby duckling), but heading out for dinner I couldn’t wait to try the evening offering..."

Read more about my amazing night at the 'Slate over at Motif Magazine


entree

Balsamic Honey Glazed Chicken

October 17, 2014


Balsamic Honey Glazed Chicken

Balsamic Honey Glazed Chicken

Balsamic Honey Glazed Chicken

A whole roasted chicken is always going to be a seriously low faff, delicious meal to feed a whole bunch of people- and it's usually far cheaper than buying prepared chicken breasts.

Even if there are only one or two of you to feed, roasting up a whole chicken takes away much of prep of other meals in the week: lunch salads and sandwiches, pies, curries, stir fry, risotto- this birdy is fabulous in them all!

The honey and balsamic glaze on this chicken gives it a zingy, savoury coating and keeps the meat within wonderfully tender and juicy.


Ingredients: My chicken was about 4 lbs which would easily serve 4, or 2 with ample leftovers

1 whole chicken- remove the giblets
1 bulb garlic
1/3 cup honey
1/3 cup balsamic vinegar
salt and pepper

Method:

Preheat the oven to 400F.

Chop the garlic bulb in half through it's 'equator' and rub the cut side of the cloves over the chicken. Pop the garlic halves into the cavity of the chicken and place the chicken into a roasting tin.

In a cup, mix the balsamic vinegar and honey and whisk together until the honey dissolves into the vinegar completely. 

Paint the chicken with a layer of the honey vinegar mixture using a pastry or silicon brush, it may seem like it isn't sticking but a thin layer will which, when cooked, will help further layers to stick and build up when roasted.

Season the skin with salt and pepper, then put the chicken into the hot oven. Roast at 400F for 15 minutes then paint on another layer of honey vinegar over the chicken, turn the oven down to 350F and roast for the remaining time your size of bird requires. 

The general rule with chicken is to roast for 20 minutes per lb at 350F plus an additional 15 minutes. You should always check you chicken is cooked through either by inserting a skewer or knife into the thickest part of the breast and thigh and seeing that the juice run clear with no blood, or by using a met thermometer. 

Paint another layer of balsamic glaze onto the chicken every 10 minutes to build up a good thick, sticky layer. If the residue in the pan starts to bake to a crisp, splash in a little water to stop it burning and turning acrid, and to make a sticky sauce to pour over the finished dish.

When done, slice up the meat and lay atop some delicious olive oil mashed potato, the white juicy breast meat looks incredible against the inky black, glazed skin!


press

Motif Magazine: Seasonal Recipes for October

October 15, 2014

Motif Magazine: Seasonal Recipes for October

Motif Magazine: Seasonal Recipes for October

Motif Magazine: Seasonal Recipes for October

Fall is certainly in the offing, with chilly nights and crisp days fast becoming a meteorological norm.
October heralds the full force of the apple and pear season plus the readiness of beautiful shelling beans such as borlotti (also known as cranberry) and butter (also known as lima). Beautiful roots such as the sweet, aromatic parsnip also make their debut, doing so well as a sweet or savory ingredient.
My recipes in October start to have have touches of warming spices and chili heat, some rich sweet hints nestling well with a lovely cup of tea or warm cider!

Head on over to motifri.com to see my October seasonal recipes:


entree

Freezer Meals

October 13, 2014

Freezer Meals

Freezer Meals

Freezer Meals


Freezer Meals

Theres something really nice about knowing your going home at the end of the day to a lovely home cooked meal. There isn't always something lovely about the idea of going home and having to make that home cooked meal at the end of the day.

It's pretty obvious that eating something that's been home cooked, using decent ingredients is going to be better for you than something processed and stuck in a microwave ,but it's not always that simple. Stocking up your freezer however, can be.

If you know you've got a busy week ahead or you'll be away, leaving a less than confident cook fending for themselves, spending a little bit of time on a Sunday afternoon can make your week so much easier.

I always use disposable tins topped with foil, it means that your entire arsenal of kitchen dishes and pans isn't stuck in your freezer (you also risk them shattering in the heat extremes of the freezer and oven) and as the aim of the game is reducing hassle, it cuts down the weekday washing up. You could use plastic tupperware dishes but these do need washing up and cannot be thrown in the oven and ignored for an hour whilst you pour yourself a well deserved glass of wine and catch up with your DVR.
These foil dishes are slightly concertina-ed at the corners, so if you end up needed to reheat in a hurry you can pop the frozen block out of the tin and into something microwaveable. 

If you are cooking for a family, group of friends or housemates, get large dishes for multiple portions. I usually use a 2 person portion foil dishes, that way if it's a time saving quick meal for two of us it's all there or if it's for someone on their todd there's only a small amount of leftovers for the next day or a lunch.

Choose a couple of dishes that can be heated up in the oven and doesn't involve any prodding and poking when they are re-animated. My go to's are:

Cottage Pie
Replacing the mashed potato topping with mashed cauliflower ups the vegetable content of this 'all in one' meal, meaning there's little need for any side dishes and extra preparation. Packed with carrots, peas and turnip this is a hearty, healthy freezer favourite

Chicken Fajitas
Though the sliced, spiced peppers, onions and chicken do well from some accompanying tortilla wraps and sour cream, these are both items with a long shelf/fridge life (you can even freeze tortillas) so you can have these on hand easily

Turkey Chilli
Using the lean turkey mince rather than beef means making a large batch and enjoying it a couple of times in one week doesn't damage any diets! The accompanying rice is a one pot side dish, if time (or kitchen prowess) is really of the essence, steam packs of rice are easy to have in the cupboard.

Chicken Curry
My love of curry is well documented so this can hardly be a surprise! Anything with spices in it LOVES being slow cooked or heated in the oven, you won't feel like this is a convenience food- convenience doesn't mean flavourless. Try my recipe for Creamy Chicken Curry.

Pies
What ever floats your boat in terms of pie filling, I love chicken and leek in cider sauce, pre-making and freezing them makes for a perfect home cooked dinner with little stress. Pile your filling in to a dish then top with a slab of pastry (use this rough puff recipe for a quick homemade version). When reheating, leave the foil on for the first half hour before removing it for the final cooking time to let the pastry puff and brown on top.

Lasagne and Pasta Bakes
Pasta is a great carrier for loads of different kinds of flavours and sauces. Using wholemeal pasta is a great way to add in some extra goodness, make up a wholesome sauce from tomatoes and peppers (you can use this recipe if you want to keep it all home made) and smoother the pasta with it, or even replace the pasta with aubergine something incredibly virtuous!- Try my recipe for Aubergine Cannelloni


recipes

Olive Oil Mashed Potato

October 10, 2014

Olive Oil Mashed Potato

Olive Oil Mashed Potato

Olive Oil Mashed Potato

Classic mash is usually enriched with cream, milk and/or butter, this recipes uses olive oil to add flavour and smooth the texture of the potato. 

Dipping bread into a really good, peppery olive oil is so delicious and this mash recipe make that something you can enjoy alongside an entree- I served it with my balsamic and honey glazed chicken, on the blog soon!

Ingredients: serves 2

2 large (about 1lb/450g) potatoes- I used Russets as their high starch content makes for a lovely fluffy mash
Some generous glugs, about 8 tablespoons good quality extra virgin olive oil- this is your flavour, use a high quality oil that will be peppery and delicious
Salt and pepper to taste

Method:

Peel and cube the potatoes into equalish sized chunks, about an inch/3cm cubed.

Pop the potatoes into a pan and cover them with cold, salted water. Unlike green vegetables, starchy roots should be started off in cold water and brought to the boil rather than added to already boiling water. This stops them getting mushy on the outside by the time they are cooked in the middle, the heat of the slowly warming water penetrating the root equally.

Once the potatoes are tender- give them a poke with a fork to test they are tender all the way through, drain them and leave to steam dry for a couple of minutes. You want the water to evaporate out as steam as you will be adding in liquid in the form of the oil, it will also give you fluffier mash.

Tumble the chunks into a large bowl then use a hand whisk or blender to mash the potatoes. You can use a manual masher but I always finds this much quicker and less lumpy!

Add in the oil little by little as the mash starts to smooth out, starting to add it once the potato is part mashed makes it easier to whip it in and doesn't end up with your kitchen covered in oil.

Add in the olive oil until the mash is glossy and smooth but still has body, you don't want to end up with a potato and olive oil soup. Season the mash with salt and pepper to taste then serve. This super savoury mash goes really well with simply cooked fish or something with Mediterranean flavours.


recipe

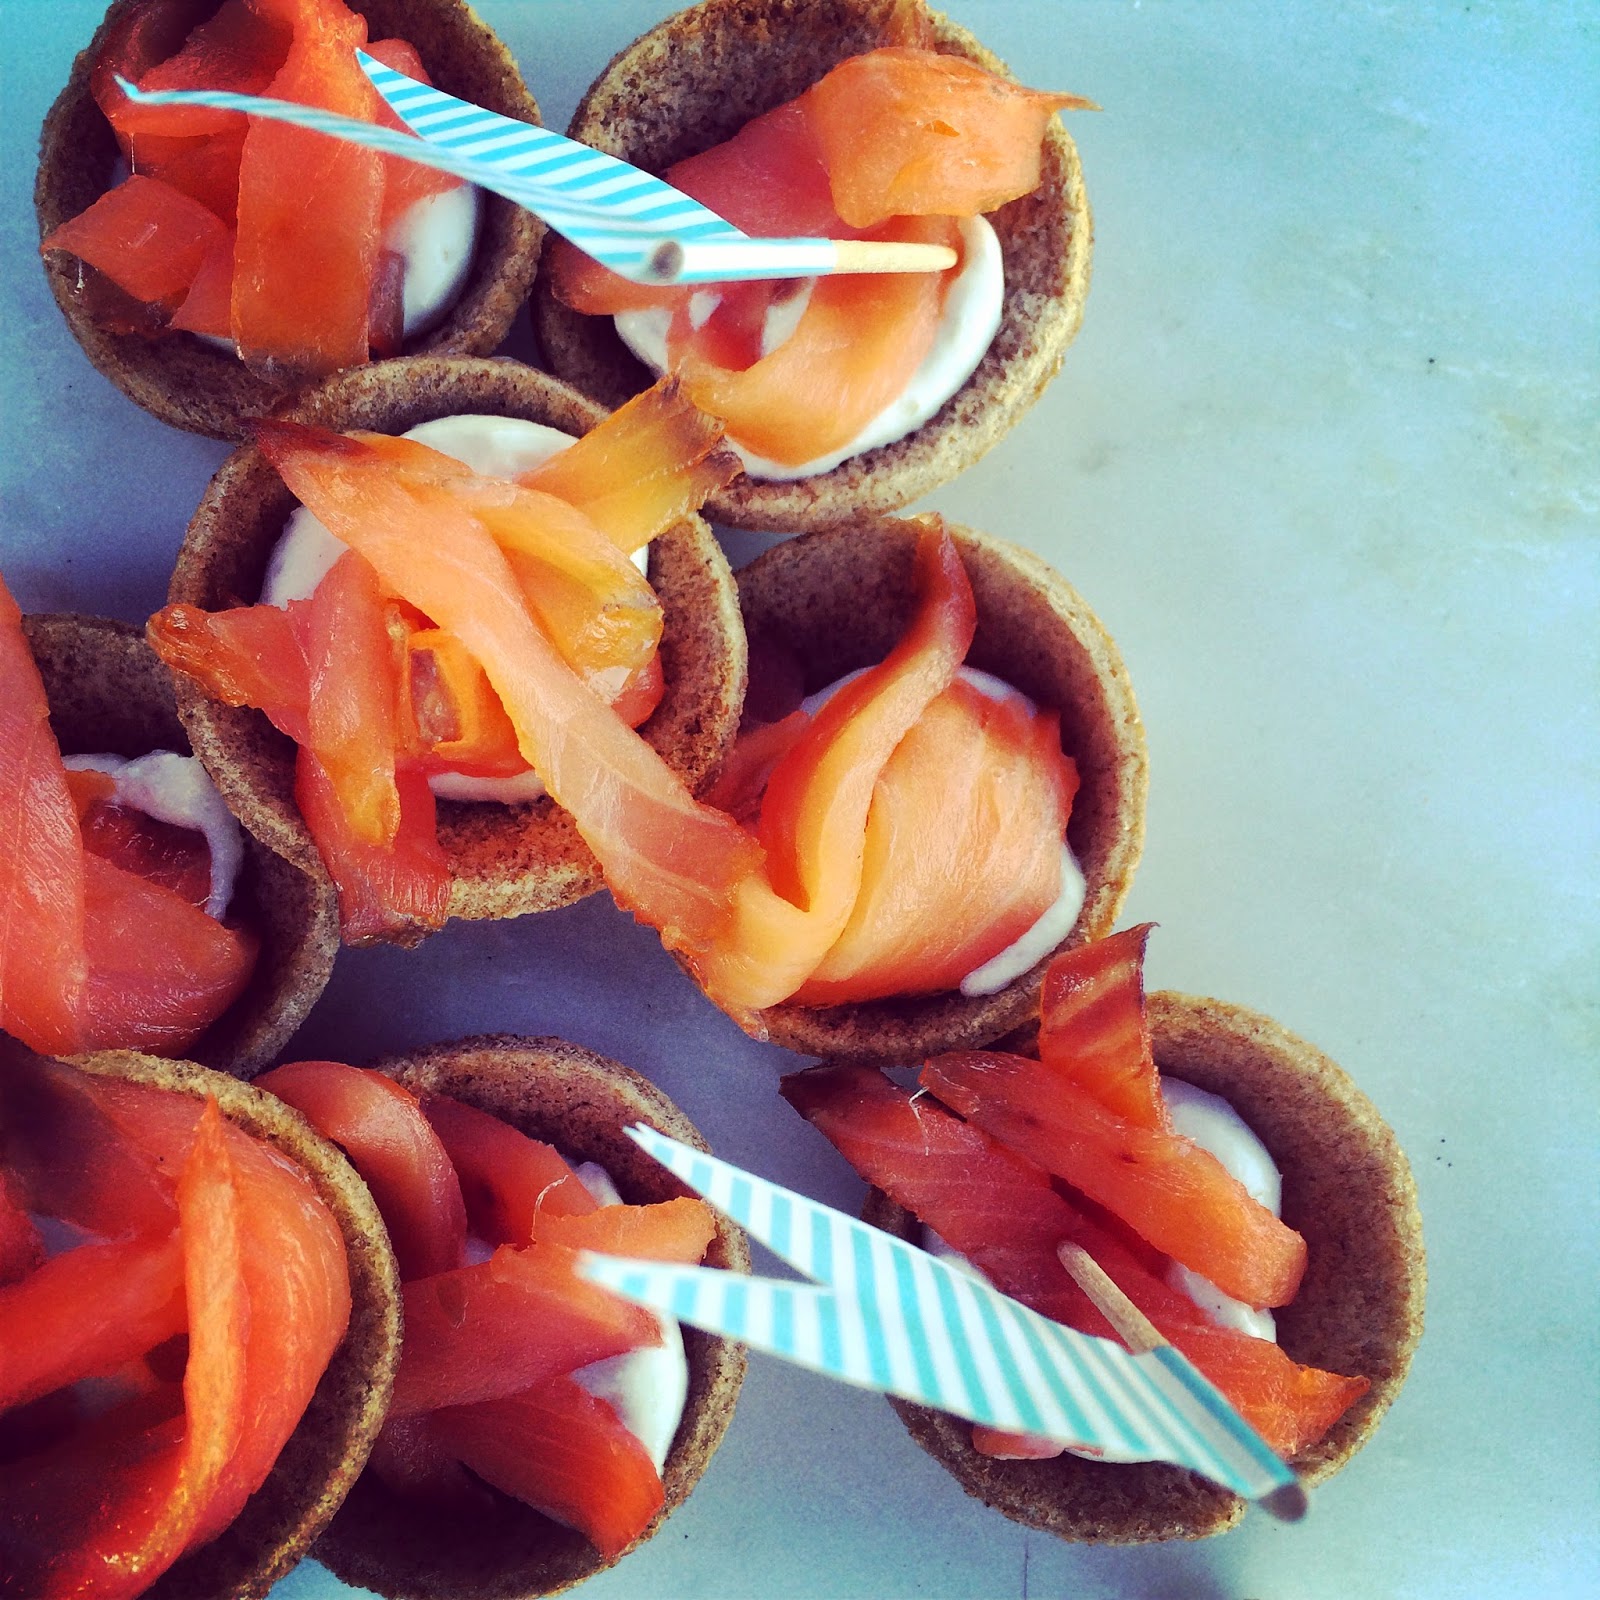
Brown Bread Cups with Smoked Salmon and Horseradish Cream Canapés

October 08, 2014

Brown Bread Cups with Smoked Salmon and Horseradish Cream Canape

Brown Bread Cups with Smoked Salmon and Horseradish Cream Canape

Canapés are the ultimate classy catering option. Bite sized, flavour packed little parcels that look beautiful and can be popped in your mouth with one hand whilst holding a drink in the other!

Really nice looking canapés should all be uniform in size and appearance, this might sound really faffy and time consuming, but if you keep it simple with flavours and ingredients it's really very easy.


Ingredients: Makes about 20 canapé

10 slices very fresh brown bread- you want something without seeds or large grains
1/2 cup/115g cream cheese
1/4 cup/65g sour cream
2 tablespoons horseradish sauce- if using fresh grated horseradish only use 1 tablespoon
7 oz/200g thin sliced smoked salmon
salt and pepper

Method:

You want to use very fresh brown bread so that it will 'squash' very thinly when rolled. The fresher the bread the more supple it will be, thinner it will roll and crunchier your bread cups.

Roll out the slices of bread until they are very thin and don't bounce to their original shape. Cut out two circles from each slice using a cutter about 1 & 1/2in/4cm in diameter.

Use a mini muffin tin (your job will be mad quicker and simpler if you have two identical tins), spray the tin with and oil mister or rub a little oil into each impression then lay a bread circle over each indentation. If you have a second tin, lay out all the circles first then press the second tin on top of and into the first, this will uniformly press the circles into the dents and form all your cups in one go. If you don't have a second tin use the end of a rolling pin, wine cork or some other blunt object to push the circles into the muffin tin.

Bake the cups at about 260f for 15-20 minutes to dry out the cups, they should not colour just dry out and become crunchy and set into their cup shape. Leave the cups to cool.

You can bake the offcuts of bread in a separate pan whilst baking the cups, whizz these baked offcuts and store for on hand wholemeal breadcrumbs.

Whip the cream cheese, sour cream and horseradish together into a thick mousse, season with salt and pepper to taste.

Thinly slice the salmon into strands and jumble to separate.

When the cups are completely cool, dollop a teaspoon of cream into each cup. If you are doubling or tripling this recipe or want to make this part quick and less fiddly you can decant the cream into a piping bag.

Pinch a few strands of salmon and set atop each cream filled cup, share out the salmon equally among the cups.

This is a really classic flavour combination that goes really well with champagne or sparkling wine for a special occasion or entertaining.


eating

Pain D'Avignon: Hyannis, Cape Cod

October 06, 2014


Pain D'Avignon: Hyannis, Cape Cod

Pain D'Avignon: Hyannis, Cape Cod

Pain D'Avignon: Hyannis, Cape Cod

On my recent Cape Cod tour, I was very lucky to be asked along to Pain D'Avignon in Hyannis. Being that we would be traveling between Martha's Vineyard and Provincetown, this offered a perfect little stop off on the way.

Tucked into a small street by the airport, Pain D'Avignon inhabits and incongruous little space. Making my way down the road I wondered if I had taken a wrong turn until the sleek, black painted frontage and Parisian style courtyard, adorned with bistro tables and chairs. 

Inside, the 'to-go' bakery area with its generously stacked shelves of freshly baked breads and counter stocked with glistening patisserie provided an appetite whetting welcome. 

Sitting next to the glass fronted wine room, it's soaring shelves hosting a thousand bottles, I'm treated to a fabulous view of the bakery in full swing, great trays of dough rolling into the ovens and towards their future as golden brown loaves.

The lunch menu had some French classic, the French onion soup was a particular favourite, as well as other European inspired offerings. What was lovely was the slight nod to the Parisian theme of Pain D'Avignon amongst most: a British style chicken salad in curried mayonnaise is served atop a croissant, whilst my tower of crispy prosciutto was tucked inside a sweet brioche bun.


Pain D'Avignon: Hyannis, Cape Cod

Pain D'Avignon: Hyannis, Cape Cod

Pain D'Avignon: Hyannis, Cape Cod

Whilst I didn't indulge this time, the huge urn of cold pressed olive oil and the local honey was incredibly tempting.

We could resist taking some of the wonderful breads and pastries along for the rest of our journey. the cheese bread was rich, savoury and delicious when toasted and topped with apple sauce, whilst the individual bread pudding lasted no longer than the first half an hour of our continuing trek!


Pain D'Avignon: Hyannis, Cape Cod

Pain D'Avignon: Hyannis, Cape Cod


Pain D'Avignon: Hyannis, Cape Cod