eat

Dripo: The Japanese Style Cold Brew Coffee Maker

October 30, 2016


When you get the call to play with a new coffee maker, especially as a new mum, you say yes. ALL THE YES.

You've heard of diets that warn against empty calories? Well as far as I'm concerned, any calorie that doesn't contain caffeine is an empty one.


I used to be a 10 hours of sleep a night kind of girl, Add two babies into the mix and that's down to about 3 or 4 hours on a good night! It's astonishing how I've adapted to getting less sleep (I say astonishing, my family might say otherwise...), I attribute a lot of my seemingly spritely demeanor to coffee. Lots and lots of coffee.

A photo posted by Holly Vine (@hollylikestocook) on

Dripo by gosh! is a new Japanese style cold brew coffee maker. It's neater and quicker than your usual overnight fridge brewing method, plus for those on the go, the brewer-to-takeaway-cup design is great for a convenient and mess free quick cuppa.

Promising fresh cold brew in two hours, I load up my Dripo once the kiddos have dropped off for a snooze after they morning feed, and have an icy cup of coffee ready for our morning stroll about the neighbourhood a couple of hours later.


Being asked to test a cold brew coffee maker as the season turns from summer to fall (with just a hint of winter in the air) might seem a bit crazy... if I didn't live in Rhode Island. One of the things I learnt during my first winter here a few years back, was that the winter doesn't stop a true Rhode Islander when it comes to iced coffee!


Yes I love my hot coffee, but when I'm dashing about with the kiddos and bundled up for a mummy tummy busting walk around the neighborhood with nearly 50lbs of babies, stroller and diaper bag, I need something to cool me off... and did I mentioned my attitude towards CAFFEINE?!


The Dripo is super stylish and incredibly simple to use, load up the coffee hopper with 30g of your choice of grounds (I'm a breakfast blend kinda gal), place an included paper filter on top of the grounds to disperse the water, fill the reservoir with icy water, screw all the sections together and leave it to do its thing.


A steady drip of cold water will work its way from the reservoir, saturating the grounds, and in turn producing a drip of amber coffee into the tumbler below. 

It can take a little adjusting to the tightness of the screwed together sections to get the vacuum pressure right and get the water dripping steadily, but once you've got this sorted there's nothing left to do but wait for your caffeine boost.


The cold brew is a much gentler flavor than hot coffee, it's softer and not as bitter its hot sister. Served as is; with added ice; or topped off with cream and sugar, once your coffee is ready it's really simple to take it to go.


Unscrew the lid and reservoir from the collection tumbler, lift out the filter basket, and screw the lid back on the collection tumbler which becomes your to go cup.

I like to fill mine up with extra ice to keep it really cold, but I'm also partial to a splash of almond milk which gives a lovely nutty taste without the added sugar from a flavoured syrup.

Get your Dripo from Amazon or at GetDripo.com.


What's your favourite way to get your caffeine fix?

*
Thank you so much to Dripo for giving me their new coffee maker for free to test out, whilst I did not have to pay for the product I only work with brands and products I genuinely enjoy. Rhode Island does not allow residents to be Amazon Affiliates so the link to the Dripo on this post will not earn me anything and is simple for the convenience of anyone that wants their own super awesome cold brew maker. 

decorate

Baby Shower Thank You Cards

October 24, 2016


Ok, so I meant to press 'go' on this post about four months ago and then a bunch of stuff happened! I did send out our Thank You cards HORRENDOUSLY late, but not quite as late as I'm publishing this post.. honest!

We hadn't planned on having a baby shower, they aren't traditional in the UK so it didn't really occur to us that we might have one. 

As it turns out we're having two! Upon hearing that we probably weren't doing having a pre-baby party, Charlie's colleagues very kindly said they wanted to throw us a little lunch party. At around the same time, my wonderful girlfriends, also asked if we had any plans- when we replied 'Maybe a beer or two in the garden?', they sprung into action planning something for us (be sure to check out the posts and guest posts about the shower in the coming weeks!).

After Charlie's workplace shower, I wanted to send out thank you cards with a personal touch, seeing as how they had made it such a special afternoon for us.


I knew I wanted to use a finger print heart design, two overlapping prints to represent our two babies, in a heart shape, to show our love and thanks to the people that made the day so lovely. As our babies tiny finger prints are still cooking, my little finger/pinkie print stood in for authentic baby prints!


I used some simple white cards with matching envelopes, a pale teal ink pad and a 'thank you' stamp for the inside of the card.

Though some of the hearts ended up a little bit wonky, I think it adds to the handmade feeling of the cards!

The two fingerprint design work really well for us as we're having two babies, but it would also be lovely for one baby. Another idea would be to use one finger print and add little details to it with a fine fiber tip pen, such as little eyes and a smile to make it into a character. You can also mix up the colours if you want something gender specific (blue/pink) or if you don't know the sex of your little one or are a gender neutral kinda clan then why not try something super cool like gold?!

eat

Solido Pizza Stone: Seasoning your stone

October 20, 2016


Thanks to the lovely people at Solido, I have my very own stone to play with!

You may have heard of seasoning cookware, such as cast iron, before.  It can take a bit of a time and be a bit smokey, but some people swear by it as a neccessary part of cooking with stone or cast iron.

That's where having a Solido stone comes along to save you from a smokey few hours- the stone is ready to use right out of the box! 

As with cast iron, by far the easiest way to season your cookware is to cook with it. It will take time, but after using your cast iron or stoneware with fats (both added and those in the food), a natural coating will develop to both protect and enhance the cooking surface. 

However if you want to give your stone a kick start then this is the way to do it.


Rather than using a flavourless fat such as vegetable or canola, Flaxseed is the best oil to season cookware with. 

Flaxseed oil is unique in that it is the only drying oil that is edible. A little bit of the science behind why Flaxseed oil is so good for this kind of thing is posted on Sheryl's Blog, her method was also tested by Cooks Illustrated who were pretty impressed by the results!


Another top tip when seasoning any kind of cookware is to ditch the oven and get outside to your grill. Seasoning cookware is smokey. You have to heat the oil beyond its smoking point as a part of the process so there's no getting away from the slightly acrid aroma of burnt oil hanging around your kitchen, or the real possibility of a couple of smoke alarm flexing their muscles. 

If you don't have access to an outside cooking set up just be sure to open your windows, get your kitchen fan on high, and tuck away any delicate fabrics that might absorb the smokey smell- it's also a good idea to make sure kiddos and animals are out of the way if you can.


The key to stoneware seasoning, rather than cast iron seasoning, is being really aware of heat shock. You will be heating the stone to an exceptionally high heat, be sure to do it gently or you make be left with a very nice supply of baking stone mosaic pieces. 

Always start with a cold grill (or oven if you've got great kitchen ventilation!) and heat that stone up slowly.


If this process all sound a bit much then the Solido Pizza Stone is definitely for you as you don't have to do any of this faff- and anything that has minimal steps between a crispy pizza and my tummy is fine by me!

If you are keen to give it a go, or have another piece of stoneware in need of seasoning, follow the steps in the video below for a fuss free seasoning tutorial:


Thank you so much to Solido who have provided me their Pizza Stone free of charge for me to play with and test out some recipes on. Though I did receive the item at no cost to myself, I only like to work with products I genuinely enjoy and would use in my real life. Out of respect for my readers and blog visitors I will alway give authentic and honest information and recommendations about any product I work with. 

read

A sneak peak of Jane Green's cookbook: 'Good Taste', Exclusive Q&, + Event Info

October 18, 2016


When Robin Kall Homonoff, of Reading with Robin (avid readers MUST check our her events, podcasts, & unmissable Point Street Reading Series!), called me about Jane Green's new book I jumped at the chance to get my hands on a copy.

Best known for her fiction novels, Jane has swapped the fiction for the kitchen and published her first cookbook. To celebrate the release of Jane's book: 'Good Taste', Robin is hosting an event 'In Celebration of Jane Green's Good Taste' at Roger Williams Casino on October 26th (use exclusive code HOLLYCOOKS for $10 off your ticket!)


Packed with beautiful recipes, and equally beautiful images of the tasty food. The book promises 'simple, delicious recipes for family and friends' and certainly delivers- the only awful thing about getting this book when I did, is that due to our upcoming move, I can't start cooking any of the wonderful dishes yet!


Food and entertaining go hand in hand for me, and Jane's book has so many ideas for simple, wholesome, flavourful food that I can easily see sharing with those I love.

Jane took some precious time from her very busy schedule to chat to me about 'Good Taste' and the story behind it, including her move from the women's literature scene (in which she is a multiple New York Times best seller), and her early career in journalism.

A video posted by Holly Vine (@hollylikestocook) on


Q: It's so lovely talking to a fellow Brit living in America! When did you move from the UK to the States? What made you make the trans-Atlantic leap? 

A: I moved here fifteen years ago. I had long been fascinated with America, and had always hoped I might live here one day. I married an American, and once our son was born, we started talking about it, although when it happened, it was entirely unexpected. We had come here for a vacation, and decided to look at houses “just for fun”. Of course by the end of the day, we had bought a house.

Q: You are best known for your incredible portfolio of best selling novels, but you began your writing career in journalism. Did you draw on your experience as a journalist to start your fiction career? What drew you to women's literature? 

A: The greatest lesson of all that I learned as a journalist was that writing is a discipline, and you get your words on the page, whether you feel like it or not. In that sense, I have always drawn from that journalistic experience. Working on a national daily newspaper, when an editor asked for 1,000 words on any subject, within an hour, it had to be written, whether I felt like it or not. I always say it was the best training I ever had. I wrote my first book in 1996 after reading High Fidelity by Nick Hornby, and realizing that nobody at the time was writing about the single thirty-something woman.

Q: Your newest book, "Good Taste" is a cookbook, what inspired your leap from fiction to the kitchen?
A: I have included recipes in a couple of my novels - Promises to Keep and Saving Grace - and had a secret wish to write a cookbook, but honestly didn’t know if anyone would be interested. I decided to self-publish a collector’s edition, selling it through Kickstarter, and it was so successful, Penguin Random House then approached me to publish a more mass-market version themselves. Writing is how I make sense of the world, and cooking is what makes me feel at home.

Q: 'Good Taste' is a book of 'simple, delicious recipes for family and friends', is food an important part of your relationships? What made you want to share these recipes in particular? 

A: Many of the recipes are passed down from my mother, and Grandmother. I love food, but more than food, I love feeding people. Inviting people to my home for dinner is less about the food than it is about the experience: I want everyone who walks in the door to feel instantly comfortable, and welcome, and I want to serve them the kind of comfort food that will make them feel nurtured, safe, and loved. These recipes are all spectacularly easy, but delicious. They will make everyone think you have slaved over a hot stove for hours, when in fact they are for every level of cook. 

Q: Do you have a favorite recipe in the book? What is it about this recipe that is so special to you- is it the finish product, the process or the memories it evokes? 

A: I do adore the sinfully delicious Pumpkin Gingerbread Trifle, probably because I tend to only make it once a year for Thanksgiving. This is my mother-in-law’s recipe, and very early on when I was just getting involved with my husband, she threw a dinner party and served this. My husband (then very new boyfriend) and I got up to clear the table. I carried this half-empty bowl of trifle into the kitchen, we both looked at each other, and without a word, at exactly the same time, we both grabbed spoons and dived in. I knew then this was true love.

Q: Does 'Good Taste' mark a permanent move away from fiction for you, or can we look forward to more novels from you in the future? 
A: I’ve just finished 'The Sunshine Girls' which will be out June 2017, and tells the story of three sisters and their narcissistic, self-absorbed, rather awful mother. I have loved writing this book, and think it may possibly be one of my best. That said, I’m itching to write a Young Adult novel, which will be next, and I’m hoping there will be another cookbook in the not-too-distant future!


If you, like me, are heart eyeing over this sneak peak of the book, then you are in luck. Not only can you get your hands on a signed copy, but you can feast on recipes cooked directly from 'Good Taste' at 'In Celebration of Jane Green's Good Taste' at Roger Williams Casino on October 26th.

A few tickets tickets are still available but selling fast, so if you want to experience some of these simple, delicious recipes get your ticket over at Eventbrite today- don't forget to use code HOLLYCOOKS for $10 off your ticket!


eat

Solido Pizza Stone: How to season, perfect pizza, + heavenly roasted veg

October 16, 2016


So we all know that if food could rule then pizza would be our overlord, as such when I was contacted by Solido to check out their new pizza stone I was very excited!


The Solido stone is made of cordierite, the same material used to line pizza ovens. Not only does the quality of the cordierite match the industry leaders in the baking stone market, the Solido stone has a few more feature that set it apart from the rest:

  • Thickness of the stone- The Solido stone is .75 inch thick with another .35 inch added by the spiral feet. That's 1.1 inches of stone cooking surface against the industry leader's .7 inch. The more stone, the better the heat retention, the better the pizza!

  • The unique heat spiral- Not only is a visually beautiful feature, it increases the thermal contact surface of the stone. This means more of the heat in your oven touches the stone, evenly heating it much faster. The increased thickness, combined with the spiral’s wider heat core also gives it great heat retention.

  • Another benefit of the spiral- The stone is now elevated, so it can easily be handled and moved, which makes it incredibly user friendly for the home cook.


The Solido stone was invented, engineered and designed completely in house, combining uncompromising efficiency with a beautiful design.

With professional class features and user friendly design, Solido's mission is to transform every homecook pizza maker into a pizza chef, as they say: "You’re The Chef"

I'll be posting a series of recipes, tips and ideas for how to use your Solido stone over the next couple of weeks, so check back for:

  • How to season your stone (although the Solido stone is ready to cook with right out of the box which is huge time and mess saver!)
  • Recipe: Garlic + Rosemary Bread, Shakshuka Deepsdish, White Pizza, + Calzone
  • Recipe: Not just for pizza! Caraway Roasted Carrots and Parsnips
Get your stone from Amazon now!

Thank you so much to Solido who have provided me their Pizza Stone free of charge for me to play with and test out some recipes on. Though I did receive the item at no cost to myself, I only like to work with products I genuinely enjoy and would use in my real life. Out of respect for my readers and blog visitors I will alway give authentic and honest information and recommendations about any product I work with. The Amazon link is NOT an affiliate link, it is purely for ease of navigation.

style

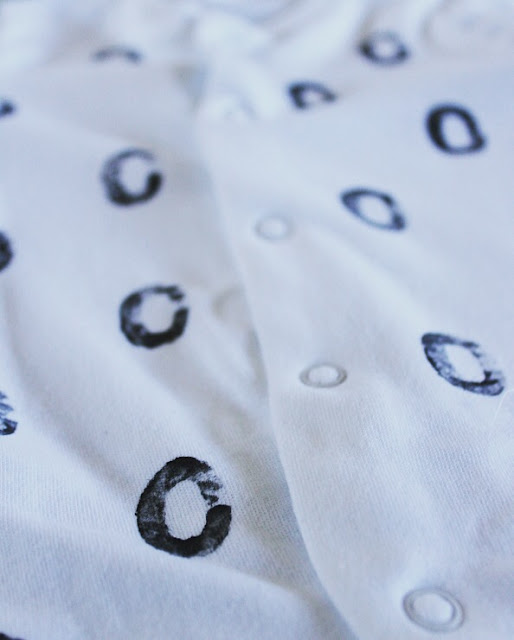
Simple Hand Printed Baby Onsies

October 14, 2016


I am incredibly lucky to have a grandmother, the boys' great nana, who can knit. I've tried to become a knitter, there's a couple of half finished patchwork blankets and slightly wonky scarves tucked into craft crates in the basement- but i've never quite got the hang of anything that isn't basically some kind of square.

I love that the boys can wear something that's been specifically made for them with so much love! Until my skills with the needles come up to par, my contribution to their handmade wardrobe are these simple potato print onesies.

What is brilliant about this DIY is you can make it your own so, so easily! Change up the colour and style of the onesie- long sleeved, short sleeved, footed PJ's, or T-shirts for older kiddos.

The print you use is entirely down to you as well. Whilst I'd stick with something simple, you've got to cut that thing out of a potato after all, there really is no limit to the print, pattern or colour you choose for your handmade attire.

What you will need:
  • An item of clothing- I chose simple white, long sleeved, footed PJ's
  • Chid safe fabric paint
  • A potato
  • Kitchen paper
  • A template of your pattern- using cooking cutters is a really easy way to cut clear, simple shapes


Method:

Iron your item of clothing to remove any big wrinkles, this will make it easier to stamp you pattern clearly.

Cut the potato into slices about half and inch thick, cut our your design using a cookie cutter or a sharp paring knife.


Dab off the excess moisture from the potato stamp on absorbent kitchen paper, otherwise the paint iwll not stick to the stamp and you will get a blotchy print.

Spread the fabric paint evenly onto a plate or tile, dunk the potato stamp into the paint and onto the kitchen paper a few times to get a base of colour on the stamp, test the pressure and amount of paint you should use.


Take a moment to think about how you want to layout your patter: an offset repeat? On line repeat? One bold stamp? The great thing about potato printing is that it retains a very hand made, individual aesthetic so it's very forgiving of wonky lines and mistakes!

Press the potato stamp down firmly and lift away in a fluid motion, try to be decisive about where you're going to stamp to avoid smudges.

If you are going to print both sides of the garment, allow the first side to dry for a few hours before turning it over- obviously.

When finished, allow to dry overnight then wash on a low heat gentle cycle to set the paint and remove any bits that didn't take to make it safe for nibblers.

Iron (if you feel inclined, my kiddos are pretty wrinkled wardrobe wearers!) and wear!


It can be tricky to personalise small children's clothes because any adornments, however well secured, could detach and become a choking hazard. This simple DIY is simple, safe and totally chic!


fashion

'The Mama' Sweatshirt DIY

October 07, 2016


Becoming a mum is a huge part of my identity. I've wanted to have a family for a long time, and have shared our struggles along the way to becoming mum and dad

I'm under no illusion that I'm not the first person to ever experience the magic of motherhood, I'm not going to start spouting rhetoric as if I'm the world's first mum; but I didn't realize quite how fulfilling and altering it would be to who I am as a person. I finally feel like I've found myself.

Instead of wearing my heart on my sleeve, I wanted to wear my pride on my chest! Here's how you can make your 'The Mama' sweater-

You will need:

*These links to Amazon are purely for the purpose of showing you what I used to make this project, Rhode Island does not allow residents to participate in the Amazon Affiliates program so feel free to purchase your project items where ever you fancy- these are just suggestions and I don't earn anything from your clicks!


Select the font you want to use for your shirt. I found a traditional school sports style font on 1001 Free Fonts. Type your phrase and adjust the size so that the words take up the entire letter/A4 sheet.

You can break up the words to make the most of the space as this is just your template, not how the letters will be arranged on the finished shirt.


Print your letter template on a plain sheet of paper. If your felt is self adhesive and has paper backing (like mine) lay the template sheet over the paper backing of your felt sheet and trace over the letters with a ball point pen.

This will create an indentation outline of your letters- remember to mirror reverse any letters that are direction specific, eg: a, b, c... D, E, F etc. Cut along the indentations to create your felt letters.


If you don't use felt with a paper backing, cut out the letters from your printed template and pin them to the felt. Cut around the paper templates to create your felt letters. If you use this method you won't need to worry about direction specific letters as you can simply flip the felt letter over.


Lay out your letters on your shirt to get the spacing correct before you apply the iron on tape. When you are happy with your design, cut or tear the tape to fit behind the felt letters, and iron onto the shirt- follow the specific directions of the iron on tape brand you use as to the iron temperature and how long to hold the iron over the fabric.


Make sure you don't have iron on tape protruding under the edges of your letters, this will result in your iron getting messy, and sticky patches on your shirt.


Let the fabric cool completely before checking the tape has melted and secured your felt letters to your shirt.

To launder, wash your sweater inside out on a gentle cycle, treat any significant stains (because with kiddos most stains are significant!) prior to washing as a heavy duty cycle could loosen your felt letters. 

If any letters do fall off in the wash, simple let everything dry, iron your letter and sweater flat, apply more iron tape and reseal.

Of course, you don't have to stick to these colours or 'The Mama'. If you're a proud aunt, brother, coffee lover, or lazy bum cut out those letters and declare your pride!


eat

Triple Chocolate Chunk Brownies

October 05, 2016


I now drink my coffee out of an insulated travel mug. I'm not going anywhere, but if I don't put it in my travel mug (which incidentally is a very pretty shade of rose gold, though completely impractical as I managed to choose the only one that doesn't fit under the Keurig... form > function) there's not a chance I'll be drinking it before it becomes ice coffee.


Breakfast is an on the go affair during the week, my pink coffee mug in one hand, and usually something chocolatey and packed with sufficient sugar to really wake me up!

These brownies are stuffed with chocolate and enough calories to make me forget I only had three hours sleep:


Ingredients:

  • 4 eggs
  • 1 cup/200g white sugar
  • 1 cup/220g soft brown sugar
  • 1/2 cup/110g butter (melted)
  • 1 1/4 /160g cup cocoa powder
  • 2 teaspoons vanilla essence
  • 1/2 cup/60g flour
  • 1/2 teaspoon salt
  • 3 1/5oz/100g bar of white chocolate
  • 3 1/5oz/100g bar of milk chocolate
  • 3 1/5oz/100g bar of dark chocolate

Method:

Preheat the oven to 350F.

Whip together the wet ingredients for the brownie batter in a jug or bowl, and add together the dry ingredients in another- do not include the chocolate bars at this stage.

Beat together the wet and dry brownie batter ingredients until smooth and combined.


The reason I like to use bars of chocolate rather than chocolate chips is that I prefer a proper chunk of chocolate in my brownie, not some naff little chips.

Chop the chocolate into thick shards, pour two thirds of them into the brownie batter and fold in.


Grease a baking tin or dish ( I use an 8 in x 12 in dish that is 2 in deep), I like to use coconut oil spray, and pour the batter in the batter.

Spread the remaining chocolate shards over the batter, and place the dish into the oven for 30-35 minutes.


To make sure your brownies are cooked but still fudgey, check them at 30 minutes by inserting a knife or skewer into the brownie about two inches from the edge, it'll come out clean if the brownie is done. A skewer in the center of the brownie will look 'wet' still- don't worry, it'll set as the brownie cools.

Let the brownie completely cool before slicing it in to portions- I think 8 or 12 is idea;... its totally depends on how many hours sleep you got last night, anything below two hours? Consider 6 portions.


decorate

Getting your home Fall ready

October 02, 2016


Fall, or Autumn as my mother tongue would name this time of year, is without a doubt my favourite season.

I'm a pale redhead, so as much as I like the idea of the summer, now that I live in a country that actually has a summer, the chance of me bursting into flames when in direct sunlight is real possibility!

Now that the days are cooling off, the light is becoming golden, and that British staple 'drizzle' is a common feature of the forecast, my mood is well and truly lightened. I pretty much have Seasonal Affective Disorder but backwards. I have DAS.

Here are some small ways to bring the season into your home that are a little different from the ubiquitous bright orange pumpkins and hay bales:


Change out your hand soap for something warm and spicy


I picked up these natural beauties from Evolve Apothecary and Spa on Hope Street in Providence. Made by Farmaesthetics out of Newport here in Rhode Island, these all natural handmade blocks not only smell incredible, but you know there are no nasties hiding in them. 

I chose the 'Rainwater + Clove', and the 'Rainwater + Cider' scents. The clove is spicy and warming, whilst the cider is more subtle, but both infuse the unmistakeable scent of autumn into my kitchen when ever I lather the hand cut blocks in my hands.

*

Fragrance your home with scented candles- and FYI, Autumn colours don't have to be red + orange!


Like the scented soaps, fragrant candles instantly transition your home from summer to autumn, especially if you choose the right scents.

Don't skimp on scented candles, it's worth spending the money on a quality candle with an authentic scent rather than something artificial that will end up giving you a headache.

Some signature autumnal scents are:
  • Cinnamon
  • Apple
  • Clove
  • Nutmeg
  • Bay Leaf
  • Honey & Oat
  • Vanilla
  • Coffee
  • Plum
I chose a beautiful candle from Aster Candle, made here in Rhode Island. After spending quite some time in Stock Culinary Goods on Hope Street sniffing all the options, I plumped for the Sagittarius scent. Not only does the cinnamon, oakmoss and peach fragrance give a sweet, warm scent to my living room, my star sign is Sagittarius- so it was meant to be!

As for colour, as much as I love reds, golds and oranges you don't have to feel constrained to just that palette.

See below for my approach to colours for each season.

*

Get cozy- coordinating baby optional


The best way to make your home warm and cozy is to fill it with chunky textiles, within grabbing distance of a sofa, a good book, and a hot cup of coffee (or a LARGE glass of wine).

I like natural textures, chunky designs and neutral colours like grey, cream, brown and white.

Changing your smaller soft furnishing is a quick and easy way to change your space from season to season. When I decorate a room I lean towards a neutral palette for the permanent features of the room, such as walls, flooring, woodwork, and the large pieces of furniture. To dress and style the room I use curtains, accent pillows, throws and accessories to direct the look and feel of the room. 

These accessories and small pieces can be changed out and altered to reflect changing trends or seasons:

Spring- Pastel colours, light fabrics and textures, clear and frosted glassware, lighter furniture pieces, pale metallics, florals. Clean, bright fragrances.

Summer- Brighter colours, light fabrics with sturdy textures such as canvas and rough hewn cotton, lighter curtains to allow a breeze to enter, furniture and accessories that evoke 'indoor/outdoor' living such as lanterns, lush plants, natural wood and stone. 

Fall- Rich/warms colour- reds, oranges and yellows are traditional but heavy cream, sage green and slate blues are also favourites of mine for fall. Chunky textured fabrics, warm textiles such as wool and corduroy. Rich metallics like gold, copper, and iron. Candle light and warm fragrances. 

Winter- I like to use bold colours at opposite ends of the spectrum: black and white, with accents of grey and green to soften them. Natural birch bark, ferns, eucalyptus, slate, and marble. Pops of rich cranberry red used sparingly. Heavier curtains and furniture to create a warmer environment.

*

However you get your home ready for fall, even if it's just turning the heating up a little bit, I hope you enjoy this beautiful season as much as I do!