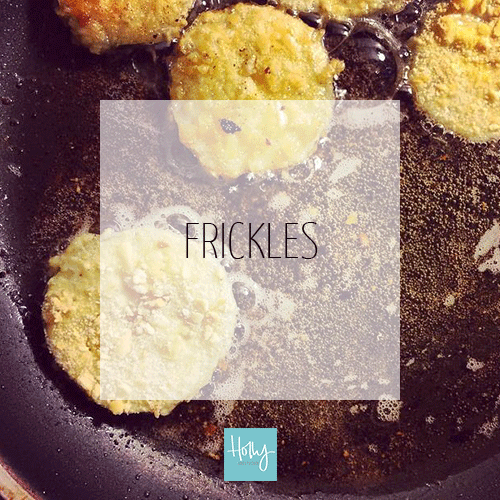
The tangy zing of a crisp pickle is only made tastier when it's coated in a crunchy golden, parmesan breadcrumb!
This is a fab little snack to serve along side drinks, especially beers, the strong savoury flavour of these fried pickles is mellowed by a cold larger.
Ingredients:
Sliced pickles- Use shop bought or follow my recipe here
1 cup/90g breadcrumbs
2 tablespoons finely grated parmesan cheese
1 egg
3 to 4 tablespoons flour
Pepper
Oil for frying
Method:
Use three plates to lay out your coating ingredients. In the first, shake out the flour so it sits evenly across the plate. On the second a well beaten egg, and on the third the breadcrumbs, parmesan and pepper mixed together.
Take the pickles out of their brine and dry them on paper towel.
Pour the oil into a frying pan and heat with a medium high flame until the oil moves very freely in the pan when swirled and a breadcrumb sizzles immediately but not fiercely when dropped into the oil.
Coat the dried pickle slices in flour, then egg then in the breadcrumbs. The flour will help the egg stick to to the pickle and the crumbs will in turn stick to the egg.
Place the crumbed pickle into the oil, laying it away from yourself. Fry on each side until golden brown, then remove form the oil and place on paper towel to drain of excess oil.
Serve the pickles whilst they are still hot, a dip made from equal parts ketchup and mayonnaise with a dash of pickle juice is a great accompaniment.
This is another really simple dish that's great as part of a casual dinner spread. Sweet from the fruit with the salty prosciutto and goat cheese, these figs create their own syrupy sauce from the baking juices mingling in the pan with a drizzle of honey and shake of pepper.
Ingredients:
6 figs
6 thin slices of prosciutto
3 oz/85g soft goat cheese
drizzle of honey
pepper
Method:
Slice a cross into the figs through their stalks. Slice almost all the way to the bottom but stop about half an inch/one and a half from the bottom so that the quarters of the fruit are held together.
Use the thumb and forefinger of both hands at the same time to squeeze the fattest point of the fig quarters together gently so that the fig blooms a little like an opening flower, giving some space inside for the cheese to be squashed into.
Wrap a slice of prosciutto around each fig, loosely enough to allow the inside to be filled but tight enough to hold the quarters from dropping flat in the heat of the oven.
Squash about a teaspoon of goat cheese into the center of each fig, use up all the cheese equally among the fruit.
Pop the figs into an oven proof dish then drizzle over about a tablespoon of honey and a good crack of black pepper.
Bake in the oven at 370F for 15 minutes, until the cheese is lightly golden on top and the figs tender and soft.
Fall may well and truly be in the air but there are still some beautiful tomatoes to be had in the stores before the end of September.
To turn this tasty tomato salad into something wholesome and befitting of a fall day, I like to use brown rice tossed in a delicious herby dressing made sharp and creamy by feta and olive oil.
Ingredients:Makes a large platter to serve about 10-12 For the dressing-
1/2 cup/120ml olive oil
3 tablespoons lime juice
large bunches of flat leaf parsley, mint, dill, tarragon and cilantro
2oz/60g feta cheese
pepper
3 cups brown rice
1 punnet (about 2 cups/400g) fresh tomatoes
a few leaves of mint
salt and pepper
Method:
Bring a large pan of salted water to the boil and pour in the brown rice, cook until tender- this will depend on your variety of rice but should take between 15 and 20 minutes, test a grain to be sure. Brown rice retains a more significant 'bite' than white rice, which makes it great for salads and holding dressings without becoming sticky and soggy.
Drain the rice and set aside to cool.
To make the dressing, place all of the dressing ingredients into a blender or into a jar (for easy storage if you are making more than you need or making it ahead of time) and use a stick blender to whizz into a bright green, creamy sauce.
Taste and add in additional seasoning, I've not listed salt as the feta should give enough of a salty edge to the dressing to suffice, plenty of pepper is a must though.
Chop your tomatoes, mine were babies so only required slicing in half- if you have large varieties then chunk into quarters or eighths, then season with a little salt and pepper and a few strands of finely sliced mint.
Once the rice is completely cool pour over the dressing and tumble it through the grains so that they are well coated. Layer onto a large platter and spread out, making a well in the center to pour the tomatoes into.
This is really nice alongside simple roasted chicken or stick with the Greek influence and serve with lamb kebabs or steaks.
These are a really quick alternative to the very uniform (kind of boring) store bought crackers you'd buy to go with cheese. They are a bit more rustic and have a lovely, satisfying crunch.
You can either bake the break yourself, using this recipe if you fancy doing that, or buy yourself a ciabatta loaf to make it a super swift process.
Ingredients:
Ciabatta loaf
a could of glugs of olive oil
salt and pepper
Method:
Cut your loaf into 1/3 inch/1 cm slices and tumble into a baking dish. Douse with olive oil and a generous amount of salt and pepper before mixing with your hands to get the bread coated in the oil and seasoning.
Bake in the oven at 360F for 20 minutes, shaking the pan to move the chips about after about 10 minutes.
The finished chips should be golden and crisp around the edges and ever so slightly chewy in the thicker centers.
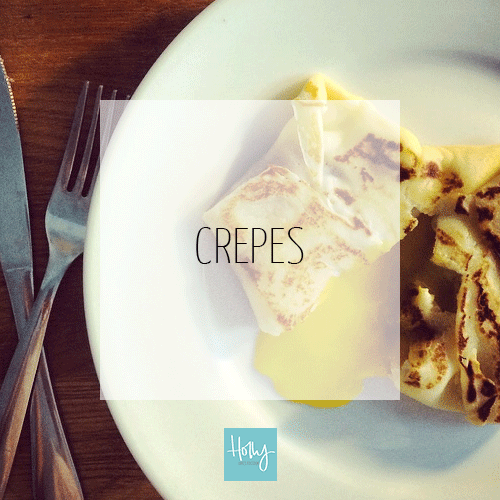
Crepes are what the British call pancakes. Thin, large rounds of a slightly spongy wrap than can be filled with anything, sweet or savoury.
Having been in America for nearly 18 months, pancakes to me are now the fluffy stacks served up with bacon, whipped butter and syrup. It was the arrival of a new food truck in Providence, O Crepe who make the French inspired, large, thin variety that reminded me of my roots and made me get the frying pan out for breakfast!
You can fill your crepes with any number of fillings, here are a couple that I really love:
Egg, cheddar & sweet soppressata
Pear, goat cheese, balsamic and honey
Lemon and sugar
Stewed apples, cinnamon and brown sugar
The versatility and simplicity of your basic crepe makes them a brilliant base for any topping. With the main ingredients being small amounts of flour, milk and egg they are also a incredibly thrifty option for any meal.
Ingredients: makes about 6-8 crepes
1 cup/120g all purpose/plain flour
1 cup/240 ml milk
1 large egg
1/8 cup/30g melted butter, plus a little more for cooking
sprinkle of salt
Method:
Whisk together all of the ingredients until smooth and creamy. Leave to rest in the fridge for at least 10 minutes, this thickens the batter and makes it even creamier- you can leave it overnight if you want to prepare ahead.
To make a stuffed crepe, drop a little butter into a medium hot frying pan, let it melt then swirl the pan around to coat the whole surface with butter. It helps if your pan has shallow or sloped sides, this will make it easier to slip a spatula underneath the edge of the crepe to flip it.
Pour in the batter, swirl the pan around until the entire surface is coated in the batter, the crepe should be thin so use a small amount of batter first. If, when swirled, it doesn't cover the whole pan, pour a little more in to fill up the gaps.
Cook the crepe for about 2 minutes, at this time shake the pan back and forward to see if the crepe is free from the pan. If the pan was well greased with butter, the crepe will slide back and forth freely when the underneath is cooked. You'll be cooking this underside again, once the crepe has been filled so you don't want it to colour too much. As soon as it has 'set' and it's free from the pan, flip it over.
There's huge ceremony in flipping a crepe and catching it perfectly, there is however, huge disappointment in watching it tumble to the floor. Whichever way you decide to tackle it, turn your crepe over.
Turn down the heat on the pan to give you a little time to arrange your fillings without the underside burning.
Pile on you fillings, I recommend leaving the egg until last (if it's one of your fillings) use the other ingredients to create a little nest so it will behave and stay where it's supposed to until it's cooked!
Once your fillings have been place, fold up the sides of your crepe over the fillings to create a square pocket. Work in a clockwise direction, folding the sides up over each other so that the filling is completely encased.
Continue to cook like this, using the spatular to weigh down the folded up edges if needs be, for about 3 minutes. Now, flip the pocket over to cook the folded edges of the crepe pocket and the filling throughly. Another 2-3 minutes should do it.
For simpler flavourings, such as lemon and sugar, I usually cook my crepe on both sides then slide on to a plate, top with lemon juice and sugar before rolling up into a long tube of zesty, breakfasty goodness.
I've just gotten back from a pretty incredible week in the Acadia National Park in Maine. We stayed on the west side of Mount Desert Island, which is quieter than the areas by Bar Harbor, but we managed to take in our fair share of everything the Island has to offer!
As soon as the plans to go to Maine were sorted I knew I wanted to cook up some lobster. We experienced some incredible examples of the simple, boiled variety at the many lobster pounds in the area. Thurston's in Bernard was particular fun, getting to pick out your lobby before having him served up, bright red with sides of drawn butter, corn cobs and potato salad.
I wanted to do something a little different with my lobster, only using the tails which are a whole lot easier to work with if, like me, you're not that familiar with the whole beast.
It's also a gentle way into lobster if the idea of tackling a scarlet alien is daunting!
Ingredients:serves 4
4 lobster tails in their shells (about 3-4oz/85-100g each)
1 1/2 cups salted butter- for poaching, don't panic!
1 white onion
splosh of white wine- about 1 glass
1/2 cup/120ml heavy cream
large bunches of fresh dill and parsley
1/2 cup/75g bread crumbs
salt and pepper
Method:
Take your reptilian lobster tails and lay them shell down on a chopping board. Use a sturdy pair of kitchen scissors to cut the 'belly' portion of the shell away to reveal the translucent tail meat. Use a teaspoon to ease the meat out of the shell gently, you want to keep it whole. Keep the tail shells as you'll be stuffing them with the finished lobster mix before baking. Repeat this with all the tails.
Melt your butter in a saucepan. You don't want it to be boiling or bubbling, just be sure that it's completely melted but keep it just before that simmering levels on a medium heat.
Plop your tail meat into the butter, it should not sizzle or bubble at all, just slide gentle into the sunflower yellow pool of butter. It's an alarming amount of butter, I know, but you're not eating it all, hardly any of it really. I do have a lovely way to use up the left over butter afterwards but i'll come to that later*.
The tails will take about 6 minutes to poach and cook all the way through, this will keep them on the 'just cooked' side of done. They will be baked as well so be careful not to over cook them at this stage or they will become rubbery when baked. If you are unsure about whether they are done, slice one through the middle, the meat should be opaque rather than translucent.
Pluck the tails from the butter and pop them on a board to cool a little, pour the butter into a bowl or jug to save for later.
Dice the onion finely then fry in a large saute pan (or a frying pan with a lid) in a teaspoon of the lobster poaching butter on a medium high heat. Fry for 4 to 5 minutes until the onions are softening, then turn up the heat under the pan. Throw in the lobster tails and a good splosh of wine. Let it sizzle away for a minute or two then pop the lid on the pan to steam the shells- this will turn the shells a bright, pillar box red colour and infuse some lobster-y flavour into the onions. Keep the lid on the pan for about 3 minutes, then remove the shells from the pan and set open-belly side up on a baking dish. Turn the heat under the pan down to low.
Add in the cream and finely chopped herbs to the onion and wine mixture and simmer on a low heat until it's thickened.
Slice the lobster tail into slices about 1/2 inch/1 & 1/2 cm pieces and add into the creamy sauce, stir until well coated then spoon into the shells, dividing the meat out equally.
Top the shells with breadcrumbs and a teaspoon each of the lobster poaching butter, then bake in the oven at 360F for about 10 minutes, until the crumb is golden.
Serve up with roasted corn cobs doused in the lobster butter.
*Another fab and completely decadent use for the lobster poaching butter it to use it to make a lobster hollandaise to serve along side seafood, shellfish or more lobster!
Having people over for dinner can seem a bit over whelming, the idea of making a meal for a large number of people, to have everything ready at the right time and to provide something everyone is going to like- eek!
I find the best way to alleviate all those worries is to put together a very casual spread of tasty things that guest can help themselves to. Formal dinner parties have their place but when it's friends popping over for something to eat it's nice for the attention to be on the conversation and not on you dashing about in the kitchen and the mountain of dishes that's piling up!
This is a real crowd pleaser, the gooey cheese is seriously good and baked in its own box it creates (almost!) zero mess.
Ingredients:
1 camembert cheese- choose one that has its own wooden box, if you can get that don't panic
3/4 garlic cloves
a few small sprigs of rosemary
a glug olive oil
salt and pepper
a drizzle of honey to serve
Method:
Unwrap your camembert from its box and remove the plastic wrapper within.
Stab some holes all over the cheese makeing sure to piece through deeply. Chip the garlic lengthways into thin slices and slot these into the holes in the cheese. Tuck a few spring of rosemary into the holes as well, you will only want 3 or 4 little spring as rosemary is a very strong flavour, you only want to lightly infuse the cheese.
Drizzle a little olive oil over the cheese before tucking the paper around it completely and popping it back into it's box with the lid on.
Be sure to remove any plastic tags or wrapping on the box then wrap it in foil. If your cheese is boxless just wrap it in waxed paper and foil.
Pop your parcel into the oven at 350F for 30 minutes, it will be done at this time but if you guests are late or don't fancy eating right away just turn the oven right down to around 240F to keep the cheese melty and warm.
When you are ready to serve, unwrap the foil, take off the lid of the box and pry open the paper at the top, leave the cheese in the paper and bottom part of its box to serve.
Drizzle with honey before letting your guests dig in with crackers or my ciabatta chips- on the blog soon!
Honey and yoghurt is a really classic breakfast pair, but I sometimes find it a bit texturally bland. Especially in the morning when my tastebuds need waking up!
Fancy granola can get a bit expensive, especially when you plump for brands and ranges that have higher quality ingredients. Baking your own granola is fab as you know exactly what's going in it such as sugars and salts, as well as being able to tailor the recipe to your personal taste- I'm a huge fan of nutty combinations but not so hot on dried fruit so here is my almond and honey version.
Ingredients:
2 cups/180g old fashioned/rolled oats
1 cup/85g flaked almonds
1/4 cup/60g salted butter
1/4 cup/80g honey
Method:
Pop everything together in a microwave safe dish and heat for a minute to melt the butter and soften the honey. Remove form the microwave and stir until everything is well coated.
Lay out on a baking sheet covered with greaseproof/waxed paper, then bake in a preheated oven at 320F for around 10 minutes. Check on the oats half way through as the sugar in the honey lends itself to burning and becoming bitter very quickly.
This recipe will keep in an air tight jar for about a month, ready for when ever you need a sprinkle on your yoghurt!
Salmon is such a great, meaty fish. It has the body and flavour to carry off some really bold and rich accompaniments and sauces.
This recipe always reminds me of parties and celebrations at home. My mum would make a huge stuffed salmon, using the fillets of a whole fish, it would be the star of the buffet table, coral pink and stuffed full of fat prawns and rich savoury cream.
This recipe is for four people but could easily be multiplied to make the larger party sized version that inspired this recipe.
Ingredients:
2lb/900g salmon fillet- you can get this at the fishmonger section of the grocery store, they will even debone and skin it for you if you don't fancy doing it yourself!
6oz/170g cooked small prawns/shrimp
1 small bunch of scallions/spring onions- about 8 or 9
4oz/110g cream cheese
1 teaspoon fresh chopped dill
1 teaspoon fresh chopped tarragon
juice and zest of half a lemon
salt and pepper
drizzle of olive oil
Method:
Remove the skin from your fillet if it's not already been done for you. Lay the fillet skin side down and use a very sharp knife to slice horizontally where the skin meets the fish flesh. Use little nicking cuts until you have released a section of skin from the fillet large enough to grab hold of with your thumb and forefinger.
Hold the skin very firmly and drag the knife in long smooth cuts against where the skin meets the flesh, the skin is really rather tough so use it as a guide. Almost cut at the skin, as long as the knife is held horizontally you shouldn't cut through the skin, it will just guide your knife along the length of the fillet.
When you have a skinless fillet you will need to decide how to cut it- this will be entirely based on it's shape. If you have a longer, skinnier fillet you will want to cut the fillet in half from 'spine' to 'belly' creating two rectangular pieces of fish that are roughly the same shape.
If your salmon is shorter and fatter then divide it into two portions of equal size by slicing it, holding the knife horizontally to the the surface, creating two slabs of fish that are the same length and width as your original fillet but thinner.
You should end up with two pieces of fish that are relatively equal in size- the bread to your sandwich so to speak. Set the salmon aside to prepare the filling.
Finely chop the scallions and add them to the cream cheese, lemon juice, zest, herbs and a good seasoning of salt and pepper then mix together into a soft paste.
Lay one of your sides of salmon into a baking dish and spread with all of the cream cheese mixture, lay the remaining piece of salmon on top and give it a little press down so it's packed together well and won't slide off when baking.
Season the top of the salmon with salt and pepper and a little olive oil and cover with foil. Place in a preheated oven at 350F for half an hour. After this time, remove the foil and bake for a further ten minutes to give a little colour to the top of the salmon.
Allow to rest for a minute or two before serving, then serve with steamed green vegetables or a light cucumber salad for a great party dish.